
Chapter 01
1. About Elixis
Elixis is a dedicated point-of-sale, batch-aware inventory, and retail pharmacy operations application built for standalone and multi-till pharmacies. It is packaged as a desktop application for Windows, macOS, and Linux. The primary pharmacy database stays on the host computer; optional Google Drive backup is available only when a licensed user deliberately enables it.
This manual guides you through every screen, workflow, and safeguard in Elixis from the perspective of staff handling daily counter traffic as well as store owners managing procurement, financial reports, and system permissions.
1.1 What Elixis Does
- Point of Sale (POS): Fast checkout with instant live medicine search by brand, generic name, or barcode, running cart, discounts, consultation billing, and narrow-width receipt printing.
- Batch-Aware Inventory: Full tracking of every stocked medicine across individual batches with distinct expiry dates and procurement costs, implementing automatic First-Expiry, First-Out (FEFO) dispensing.
- Purchasing & Stock Intake: Log deliveries from pharmaceutical distributors, which immediately and automatically increments inventory stock batches.
- Customer & Supplier Records: Maintain directory contact details, tax numbers (NTN), and lifetime transaction history for customers and distributors.
- Returns Management: Handle patient refunds and restock eligible items while logging returns of damaged or recalled stock back to suppliers.
- Reports & PDF Export: Instant visibility into daily revenue, gross profit, margin percentages, top-selling drugs, dead stock, expiring batches, and staff sales volume with single-click PDF export.
- Role-Based Staff Accounts: Enforce security through granular roles separating daily cashier activities from administrative procurement and financial reporting.
- Multi-Device Local Sync: Connect additional counter terminals and back-office machines over your store's local Wi-Fi or Ethernet network without cloud servers or recurring subscription overhead.
- Automated Backups: Protect your entire business database with instantaneous local backups and optional automated sync to Google Drive.
1.2 Who This Manual Is For
This documentation is organized to serve two primary audiences:
- Cashiers & Pharmacy Staff: Who primarily work with the Dashboard, New Sale, Sales History, Customer profiles, and Customer Returns.
- Store Owners & Administrators: Who manage Inventory batches, Purchases, Suppliers, Financial Reports, Staff accounts, Store configuration, Sync, and Backups.
To help you navigate critical information, this manual uses the following visual callouts:
Chapter 02
2. Getting Started & Initial Setup
When Elixis is launched for the very first time on a computer, it asks whether this machine will act as your pharmacy's primary database (the Main System) or connect as a companion terminal to an existing machine already running in your store.
2.1 Setting Up a New Pharmacy (First Computer)
Choose this path on your main counter computer or back-office server:
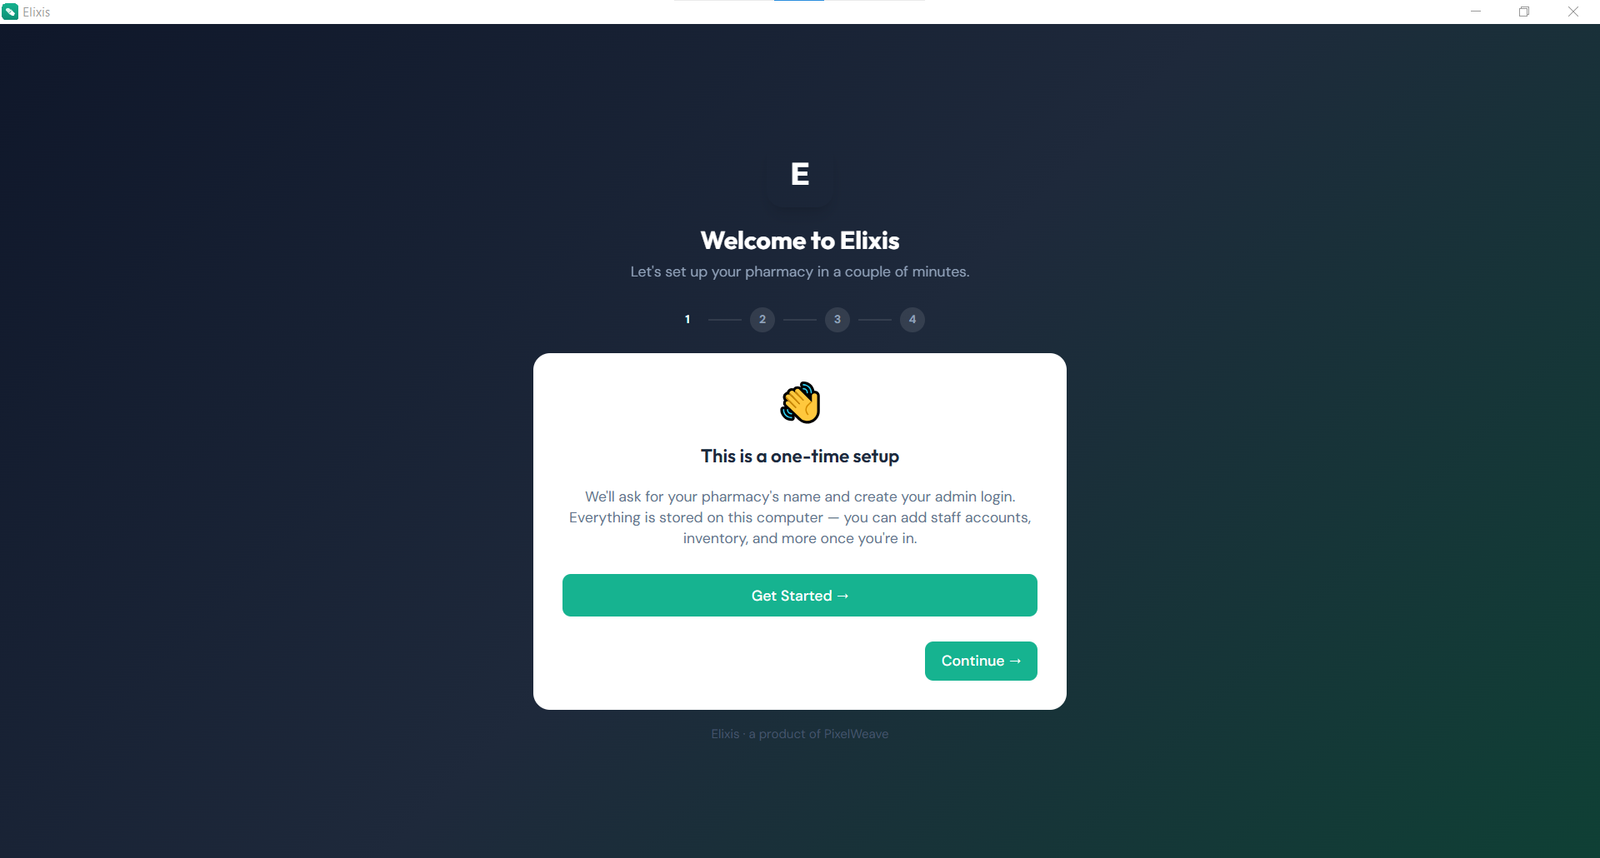
- Welcome Screen: Launch Elixis and click "🆕 Set up a new pharmacy".
- Pharmacy Details: Enter your registered Pharmacy / Store Name (required). Optionally enter your contact phone number, email address, physical location, operating currency (e.g., PKR, USD, GBP), and official Drug License Number.
- Create Admin Account: Enter your full name, choose a username (minimum 3 characters), and set a secure password (minimum 6 characters, re-entered for confirmation). This account becomes the Super Admin with unrestricted permissions.
- Finalize Setup: Review the entered details. Optionally tick "Add a few sample medicines" to populate demo inventory items for testing. Agree to the Terms of Service and Privacy Policy, then click "Finish Setup ✓".
2.2 Connecting to an Existing Device
Follow this path when you are adding a secondary counter till or a dispensing workstation to connect to your existing store database:
- On the new computer, open Elixis and click "🔗 Connect to an existing device".
- Elixis will scan your local Wi-Fi or Ethernet network and display any discovered Elixis Main Systems.
- On your Main System, open Settings → Multi-Device Sync and click "+ Generate Pairing Code" (a temporary 6-digit code will appear).
- On the companion computer, click "Connect" next to the discovered main system, type the 6-digit pairing code, and click "Pair". (If network firewalls block discovery, click "Enter address manually instead" and type the host IP address and port shown on the main system).
- Once paired, click "Continue to Login". The companion terminal immediately accesses your live database.
2.3 Signing In
Every time Elixis starts, the sign-in modal displays your pharmacy's name. Enter your username and password, then click "Sign In". Click the eye icon inside the password box to reveal what you typed if needed.
2.4 Signing Out
To end a cashier shift or switch accounts securely, click the logout icon at the bottom of the left sidebar underneath your username, and confirm "Yes, Logout".
2.5 The Main Window Layout
Once signed in, the Elixis desktop interface is divided into three functional areas:
- Left Sidebar: Features your pharmacy's branding, primary navigation links (Dashboard, New Sale, Inventory, Sales, Returns, Customers), and the Admin section (Purchases, Suppliers, Reports, Staff Accounts, Settings) for Super Admins.
- Main Viewport: Displays the active operational screen, table, or form.
- Bottom Status Bar: Shows local-network device sync connectivity on the left, running background operations (such as automatic cloud backup progress), and license status on the right.
Chapter 03
3. Dashboard Command Center
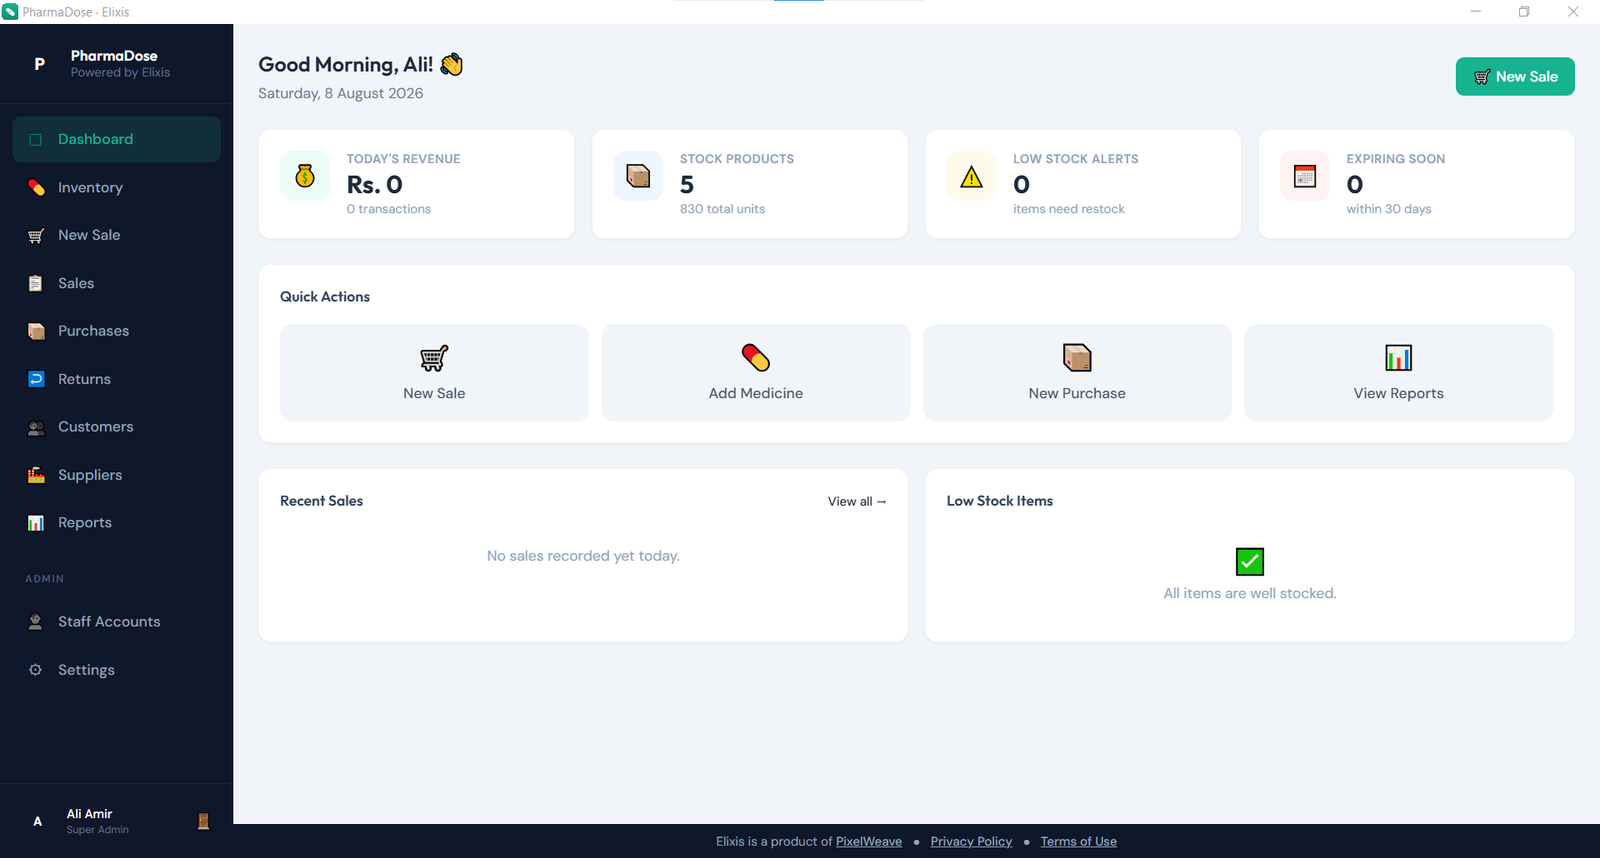
The Dashboard is your pharmacy's real-time command center upon signing in, offering instant operational visibility and actionable alerts.
3.1 Greeting & One-Click Till
The top bar displays a time-sensitive greeting with the logged-in staff member's name and current date, accompanied by a prominent "New Sale" button to open the checkout till immediately.
3.2 Real-Time Inventory Alerts
When medicines drop below their minimum safety thresholds or have batches expiring within the next 30 days, prominent notification banners appear with direct links to the Inventory screen for immediate restocking or supplier return.
3.3 Key Numbers (KPI Cards)
- Today's Revenue: Total gross revenue generated during the current calendar day and the total number of transactions processed.
- Stock Products: Total count of distinct medicine catalogue items and aggregate physical units on hand across all active batches.
- Low Stock Alerts: Number of distinct medicine lines currently at or below their configured reorder threshold.
- Expiring Soon: Count of medicines with at least one batch scheduled to expire within the upcoming 30-day window.
3.4 Quick Actions & Recent Activity
Quick shortcuts allow single-click creation of sales, medicines, purchases, or analytical reports. The bottom panels surface your 6 most recent sales invoices (with customer name, invoice amount, and timestamp) alongside up to 6 critical stock shortages flagged with amber (Low Stock) and red (Out of Stock) badges.
Chapter 04
4. Inventory Management & FEFO Tracking
The Inventory module (accessible via Inventory in the sidebar) is where all pharmaceutical products, pricing, stock levels, and batch expiry dates are recorded and maintained.
4.1 Browsing, Filtering & Search
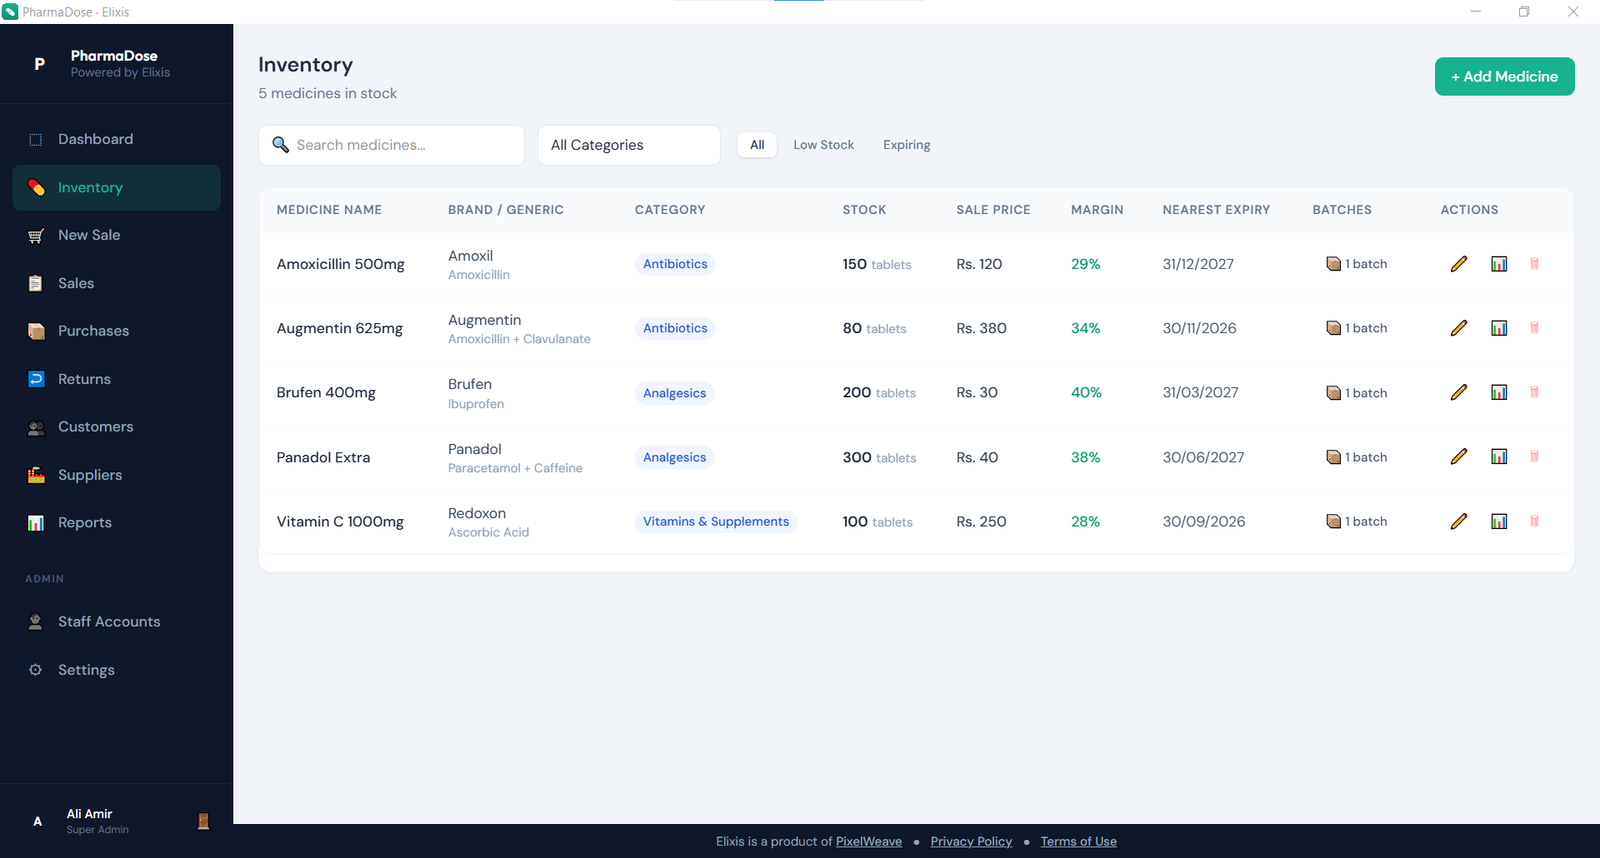
The central table details each medicine's brand name, generic name, category, available stock quantity, sale price, calculated profit margin, nearest batch expiry, and batch count.
- Instant Search: Filter the catalogue dynamically by typing a brand name, generic salt name, or barcode.
- Category Filter: Isolate inventory by therapeutic classification (e.g., Antibiotics, Analgesics, Cardiology).
- Quick Toggles: Switch between All Items, Low Stock Only, or Expiring Stock with a single click.
- Visual Stock Indicators: Available units turn amber when reaching reorder thresholds and red when completely out of stock.
4.2 Adding a New Medicine
Click "+ Add Medicine" at the top right of the Inventory screen to open the creation modal:
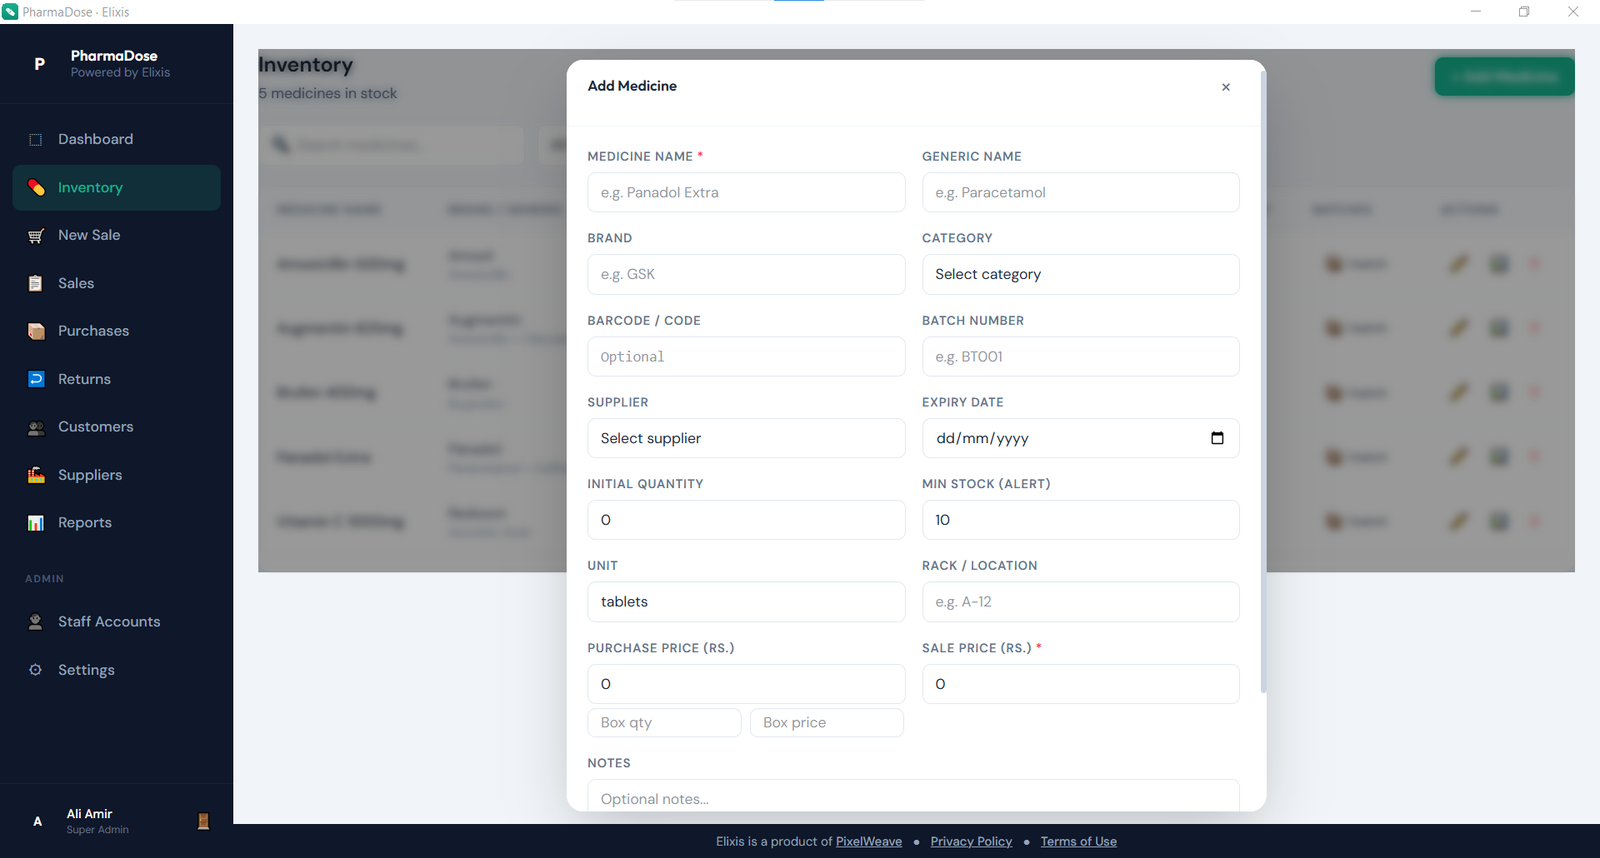
- Medicine Name: Trade or commercial brand name (required), printed on customer receipts.
- Generic Name / Brand: Active chemical composition or manufacturer name for quick counter identification.
- Category: Assign to a therapeutic grouping (configured under Settings → Categories).
- Barcode / SKU: Numerical code used for barcode scanning at checkout.
- Initial Batch & Expiry: Enter the batch number and expiry date of the opening stock.
- Supplier & Initial Quantity: Default distributor and opening units received.
- Minimum Stock Alert: Unit threshold that triggers low stock warnings.
- Unit of Measure: Select from tablets, capsules, bottles, vials, sachets, pieces, boxes, ml, or mg.
- Rack / Shelf Location: Physical counter shelf or drawer code (e.g., Rack B-04).
- Purchase & Sale Prices: Enter cost price per unit and retail price. Elixis automatically computes and displays your gross profit margin percentage.
4.3 Editing Medicine Details
Click the pencil icon (✏) on any medicine row to update product name, category, shelf rack, barcode, or standard retail price. Note that quantity changes and new batch entries should be handled via the Batches panel rather than editing the base record.
4.4 Removing a Medicine
4.5 Adjusting Stock Levels
Click the chart icon (📊) on any inventory row to open Adjust Stock. Enter a positive number to add units or a negative number to write off broken or expired packages, accompanied by a mandatory audit reason.
4.6 Managing Batches & FEFO Rules
Elixis manages stock strictly at the batch level. Click "📦 Batches" on any product to inspect all active, expired, or depleted consignments. During sales, Elixis enforces FEFO (First-Expiry, First-Out) logic, automatically deducting stock from the batch expiring soonest so that older stock is consistently cleared first.
Chapter 05
5. Making a Sale (Point of Sale)
The New Sale screen (shortcut Ctrl + N or Cmd + N) is the primary workspace for cashiers and counter pharmacists.
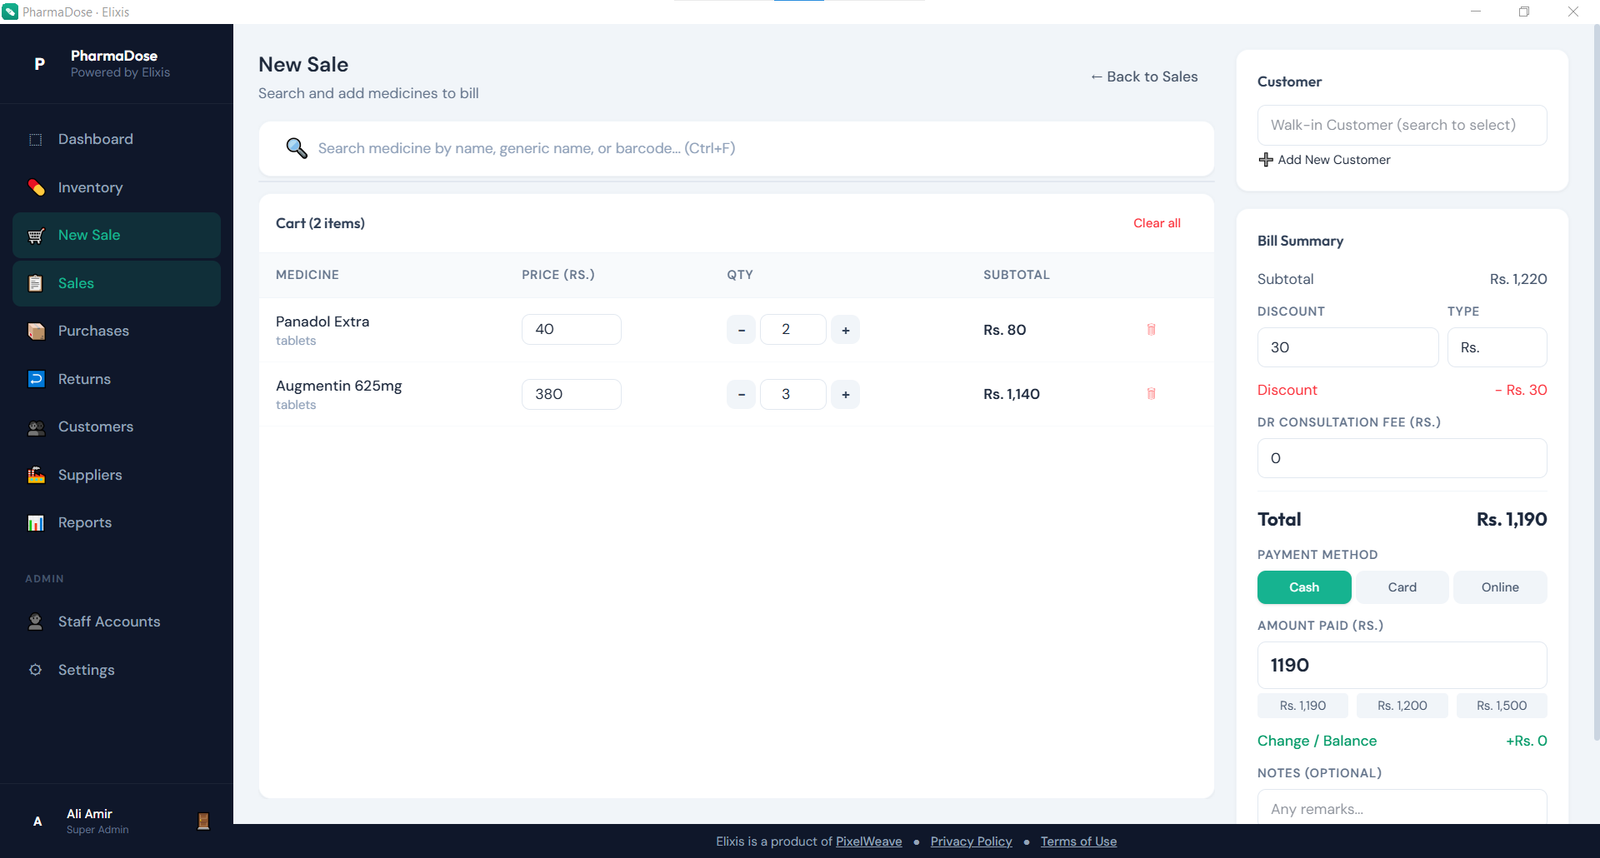
5.1 Finding & Adding Medicines
The search field receives cursor focus automatically when opening New Sale:
- Keyboard Search: Type 2 or more letters of the trade or generic name. Matching items appear in a dropdown indicating rack location, sale price, and units in stock. Press Enter to add the top item to the cart immediately.
- Hardware Barcode Scanning: Aim your barcode scanner at a product box. Standard USB/Bluetooth scanners type the barcode and transmit Enter automatically, adding the item instantly.
- Duplicate Detection: Scanning or selecting the same item multiple times increments the cart line quantity rather than creating duplicate lines. Elixis prevents adding quantities higher than total current stock.
5.2 Managing the Running Cart
- Quantity Adjustment: Use the − and + buttons or type the desired quantity directly into the input box.
- Unit Price Override: If authorized, cashiers can modify the per-unit selling price for special customer concessions.
- Line Removal: Click the trash icon to remove an individual line, or click "Clear all" to empty the entire cart.
5.3 Customer Assignment
Every transaction defaults to a generic "Walk-in Customer". To associate the purchase with a patient's loyalty and prescription history:
- Type the customer's name or mobile number in the Customer search box.
- Select them from the matching list, or click "🔗 Add New Customer" to create a new profile (Name, Phone, Address) inline without losing your active cart items.
5.4 Discounts & Consultation Fees
In the Bill Summary sidebar, you can apply:
- Discounts: Enter a value and switch between percentage (%) or fixed currency amount.
- Doctor / Clinical Consultation Fee: Add a flat consultation or diagnostic fee to the invoice subtotal for in-store pharmacy clinics.
5.5 Payment Processing & Completing the Sale
- Select the Payment Method: Cash, Card, or Online / Wallet.
- The Amount Paid field defaults to the exact balance due. If the customer hands you a larger banknote, use the quick round-up tender buttons (e.g. 500, 1000, 5000); Elixis computes the exact change owed automatically.
- Add an optional transaction memo if needed, then click "Complete Sale ✓".
Upon completion, Elixis commits the transaction, deducts inventory units from the earliest-expiring batch first, and triggers the receipt dialog.
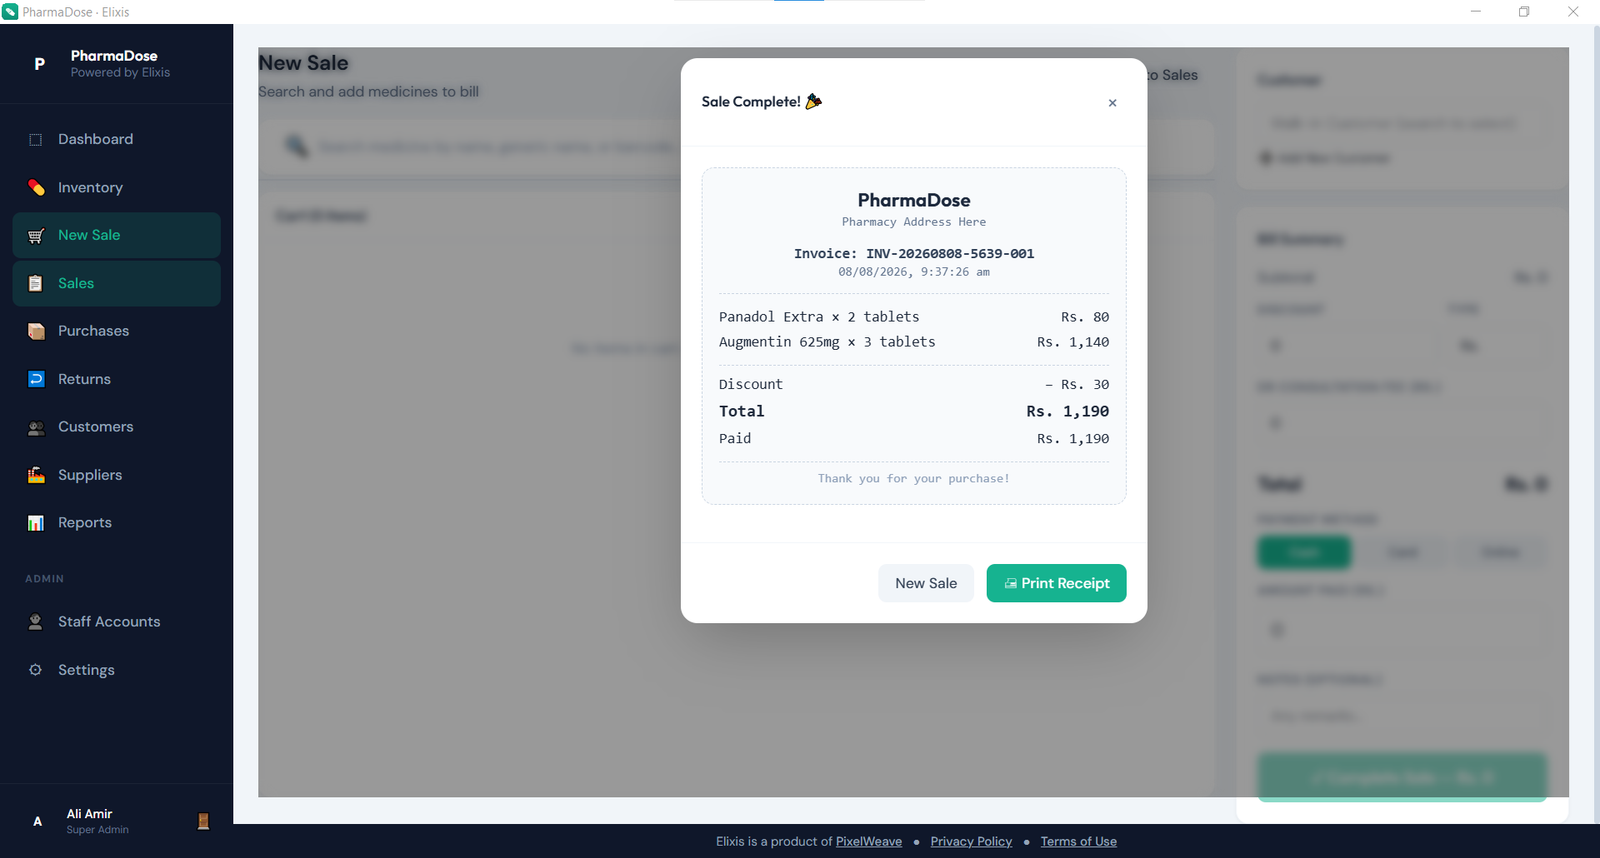
5.6 Printing the Receipt
The receipt modal formats the bill specifically for 80mm and 58mm thermal receipt printers, including your pharmacy header, drug license number, line-item table, discounts, tax breakdown, and configured footer notice. Click "🖨 Print Receipt" to trigger native printing, or click "New Sale" to clear the till for the next customer.
Chapter 06
6. Sales History & Auditing
Open the Sales screen from the sidebar to review, inspect, and audit all historical retail sales transactions.
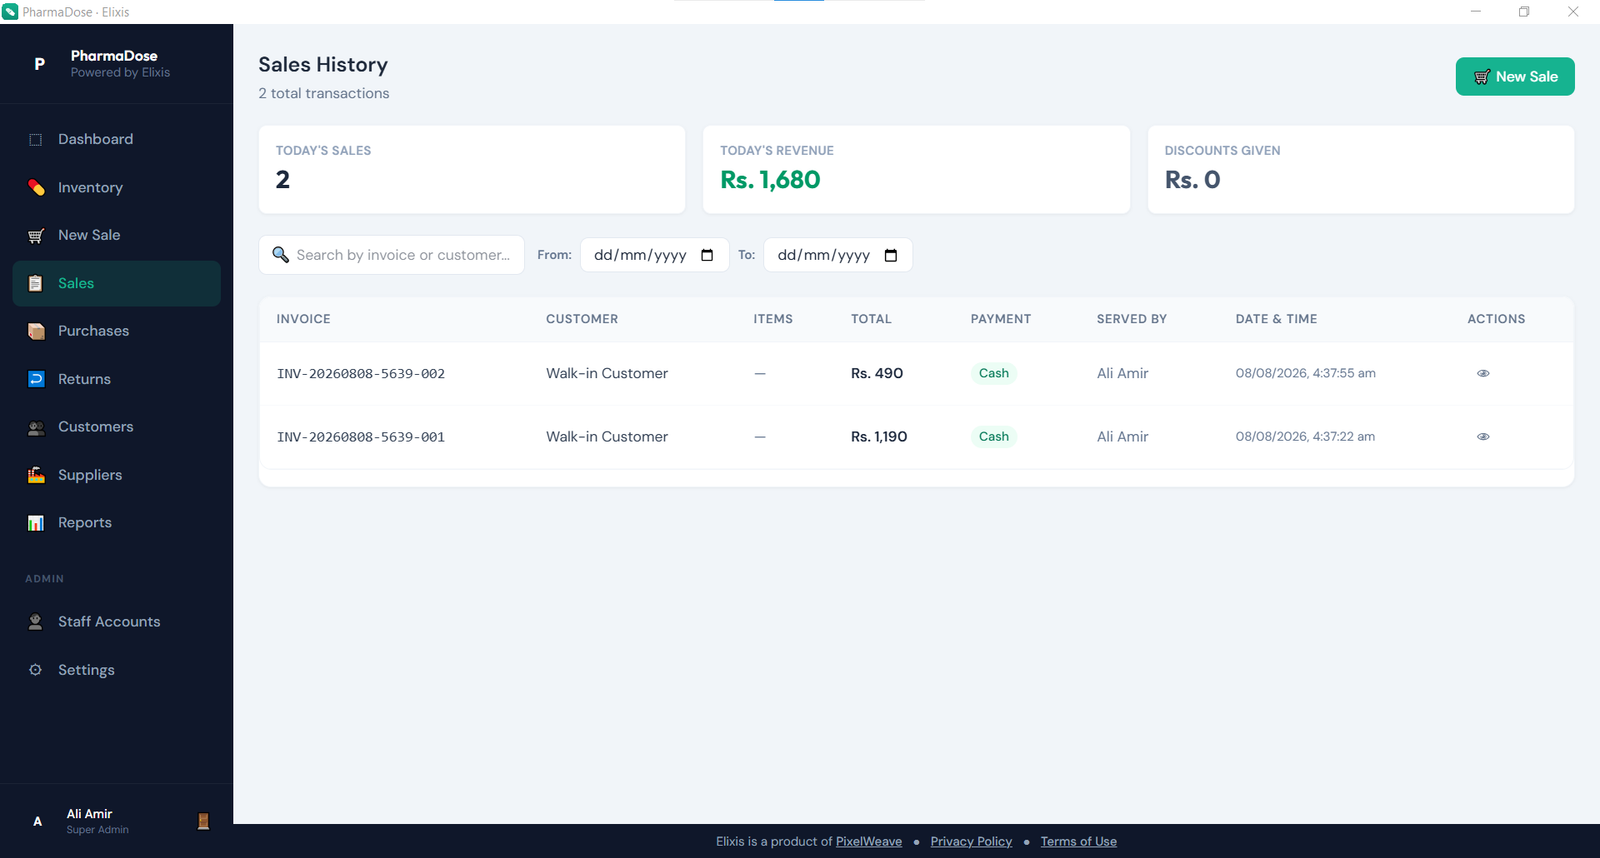
6.1 Daily Summary Metrics
Three cards across the header display today's total transaction volume, total revenue collected, and cumulative discounts granted across all tills.
6.2 Searching & Invoices Filter
Search by invoice number or customer name, or define custom From and To dates to isolate past shift reports.
6.3 Detailed Invoice Inspection
Click the eye icon (👁) on any transaction row to open the full invoice breakdown: line items, unit costs, payment mode, staff handler, and any past refund actions.
6.4 Processing Customer Returns & Refunds
When a patient brings medicine back for a refund:
- Locate the original transaction in Sales History and open its detail view.
- Click "↩ Return Items".
- Tick the items being returned, enter the returned quantity, and confirm the refund unit price.
- Restock Decision: Keep "Sellable" ticked if the packaging is sealed; Elixis will restore the stock units back into their original batch. Untick "Sellable" if the blister is damaged or opened to record a scrap loss while still refunding the customer.
- Select the refund tender method (Cash, Card, Online, or Store Credit) and click "Process Return".
Chapter 07
7. Purchases (Stock Intake)
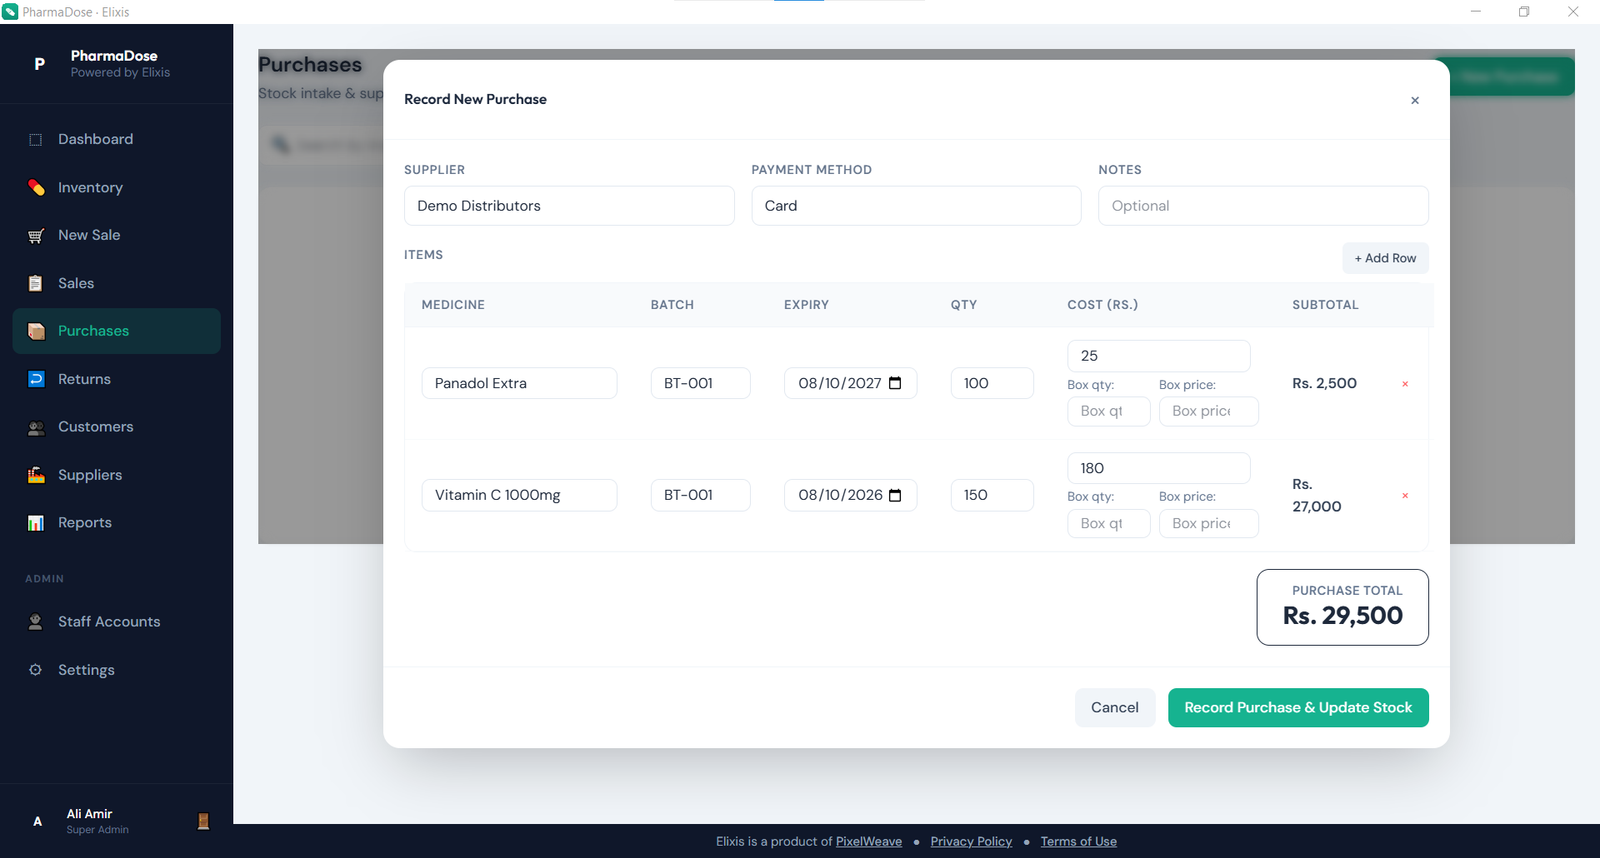
The Purchases module (accessible via Purchases in the sidebar) is where you record incoming inventory consignments received from pharmaceutical distributors. Recording a purchase both documents the supplier invoice and generates fresh stock batches in inventory.
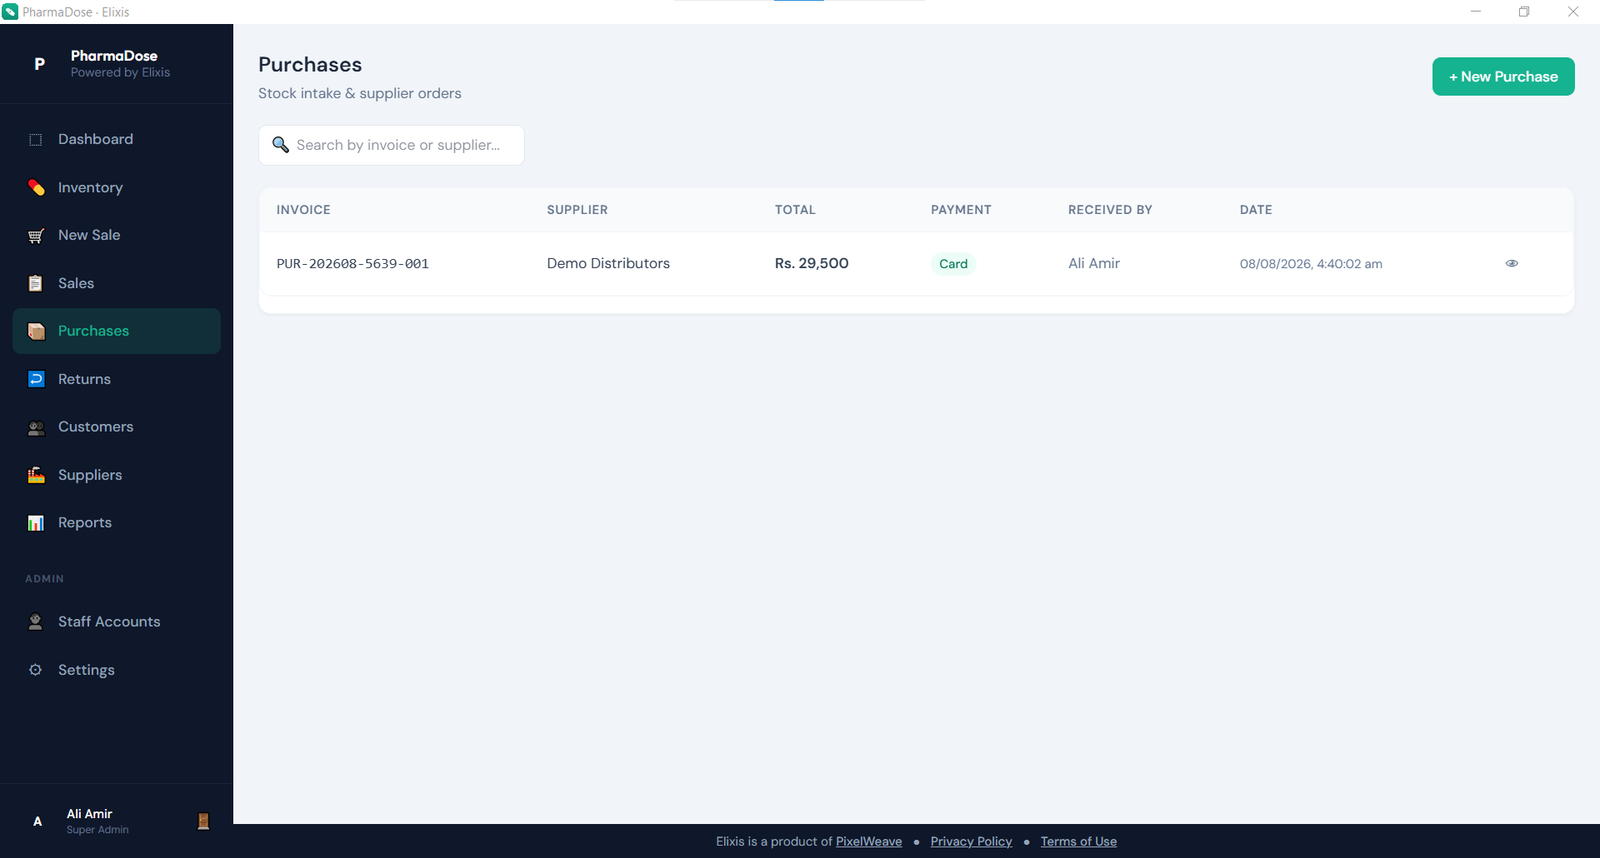
7.1 Recording a New Stock Delivery
- Click "+ New Purchase" to open the intake form.
- Select the Distributor / Supplier from the dropdown, or click "🔗 Add New" to create a new supplier entry immediately.
- Enter the supplier's Delivery Invoice Number and invoice date.
- Search and select medicines from your catalog. If receiving a new drug you have never stocked before, click "🔗 Add New Medicine" to create it inline.
- For each drug, enter the Quantity Received, Unit Cost Price, Batch Number, and Expiry Date.
- Click "Save Purchase". Elixis creates new batch records in inventory immediately.
7.2 Box Quantity & Price Helper
If your distributor's bill lists medicines priced per box rather than per individual tablet, use the box calculation widget below the cost input to compute the exact single-unit cost price effortlessly.
Chapter 08
8. Returns Management
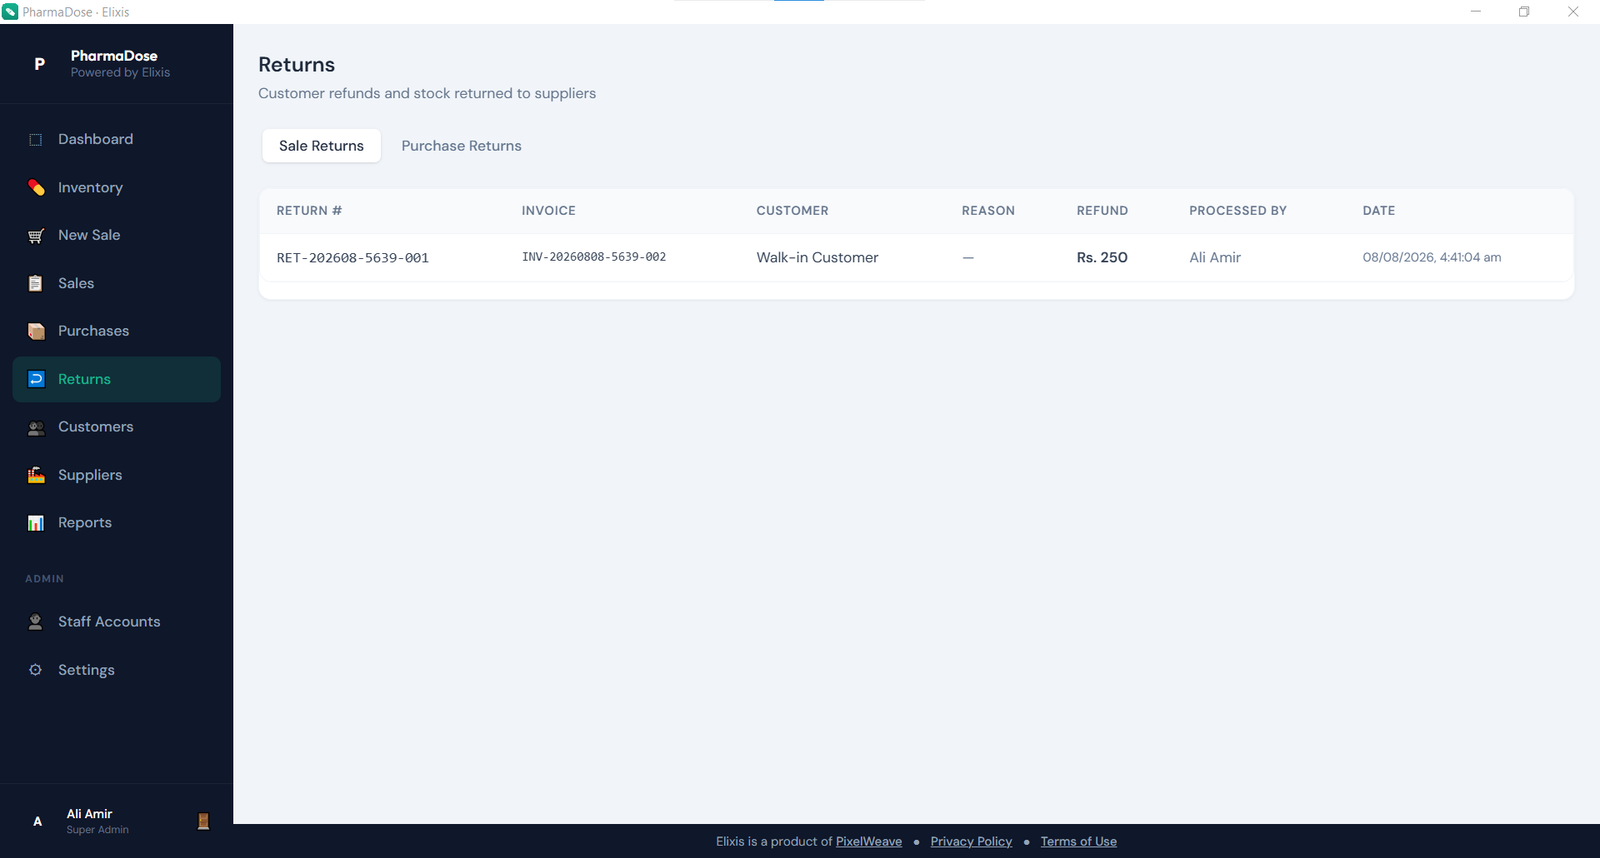
The Returns module centralizes all refund and restocking events into two dedicated tabs:
8.1 Customer Sale Returns Tab
Provides an audit trail of every patient refund processed at the counter, including date, customer name, items refunded, restock condition, refund value, and the cashier who processed it.
8.2 Supplier Purchase Returns Tab
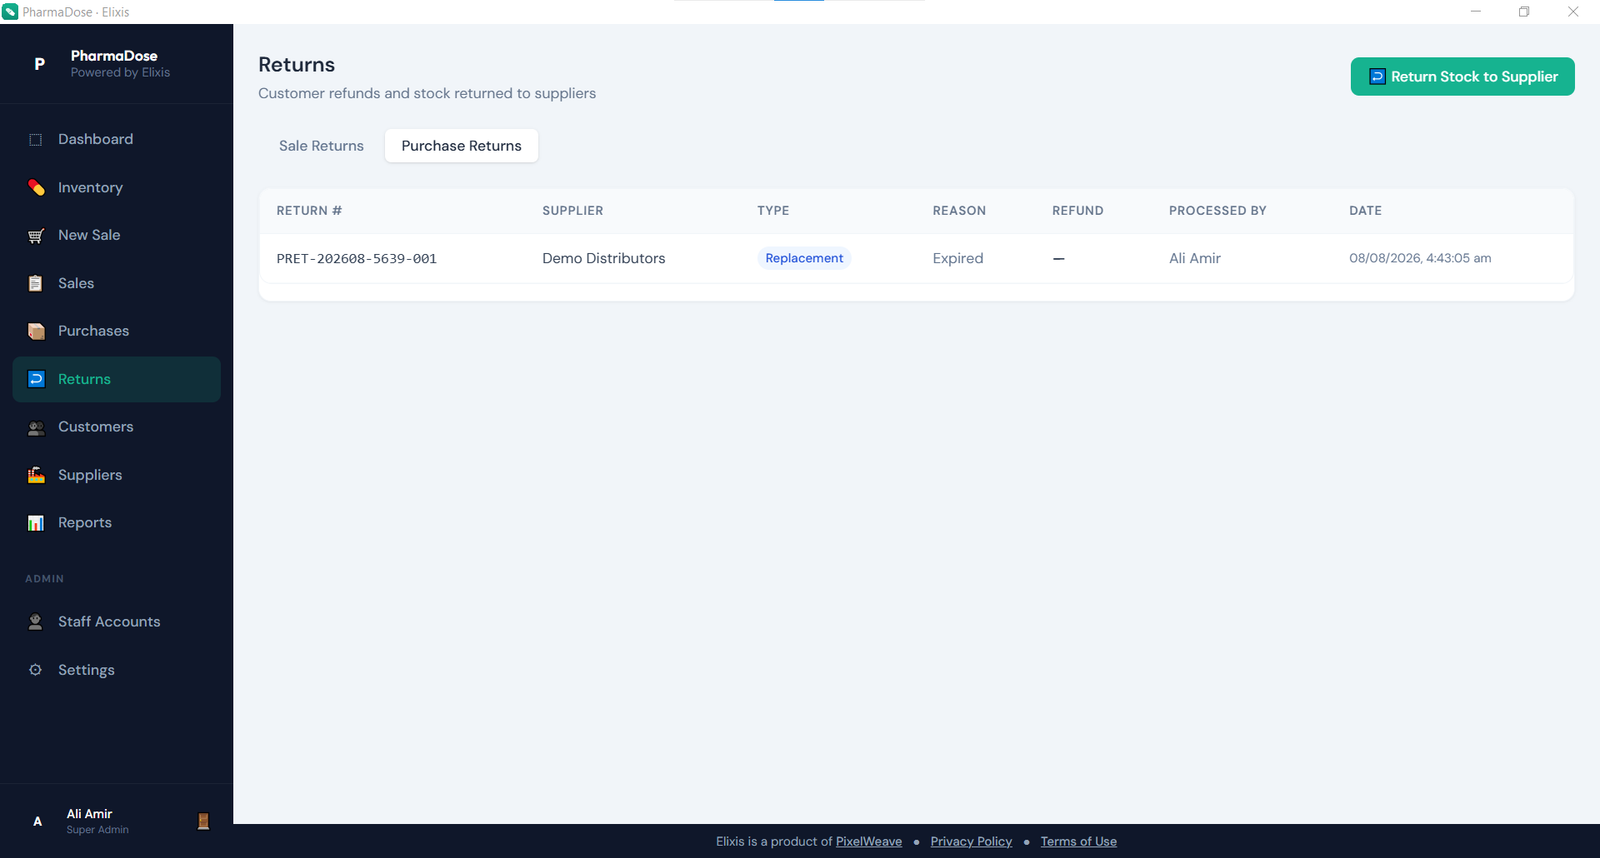
Used when returning damaged, recalled, near-expiry, or wrongly delivered stock back to pharmaceutical distributors:
- Click "+ New Purchase Return".
- Choose the Supplier and the original Purchase Order.
- Select which batches and quantities are being returned.
- Specify the distributor settlement type: Refund (cash/credit memo) or Replacement Stock.
- Click "Process Return" to decrement inventory stock from the designated batches.
Chapter 09
9. Customer Directory & Profiles
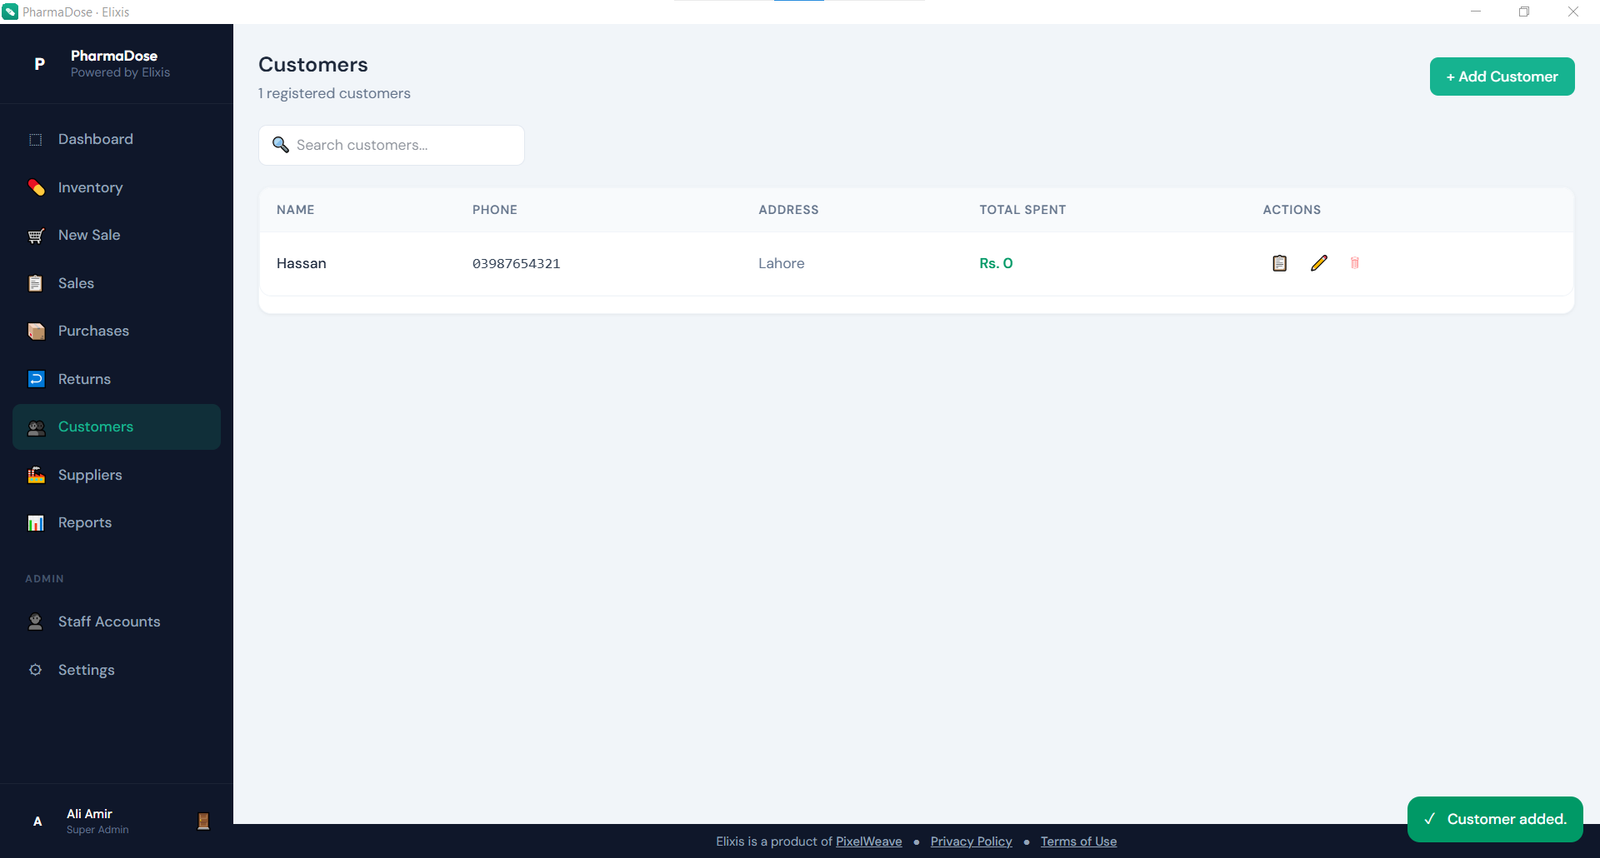
The Customers module (Customers in the sidebar) stores patient contact records and automatically tracks lifetime purchase values.
9.1 Adding a Customer
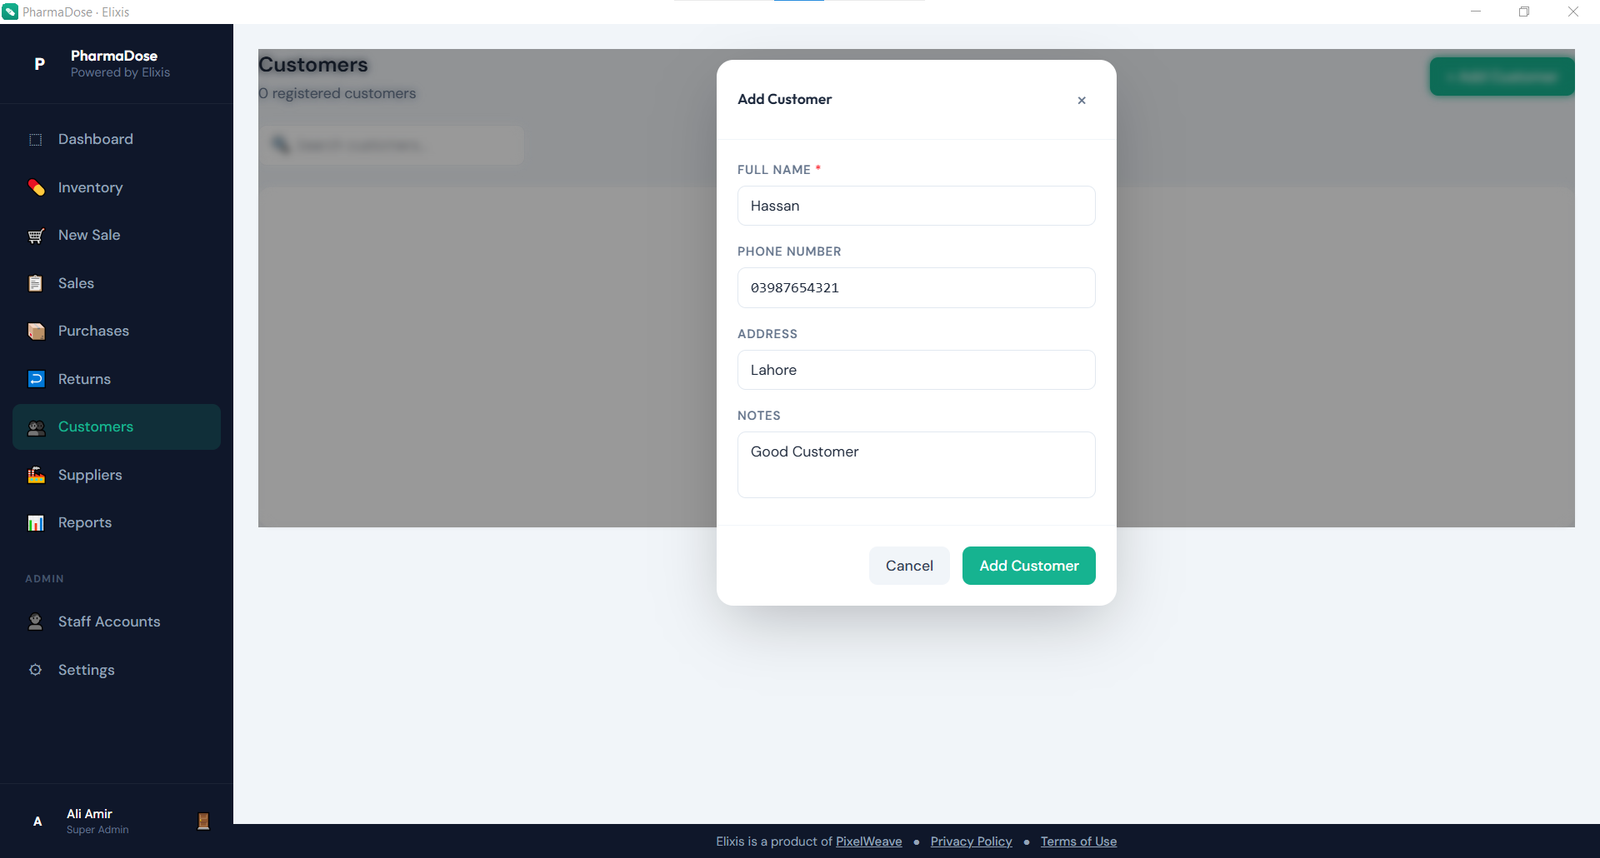
Click "+ Add Customer", enter their Full Name (required), Mobile Phone Number, Residential Address, and clinical/credit notes, then save.
9.2 Purchase History Inspection
Click the orders icon (📋) on any customer profile to view their lifetime spend, total transactions, and a list of their recent prescriptions and invoices.
Chapter 10
10. Supplier Directory & Ledger
Manage pharmaceutical companies, distributors, and wholesale suppliers via the Suppliers screen.
10.1 Adding a Supplier
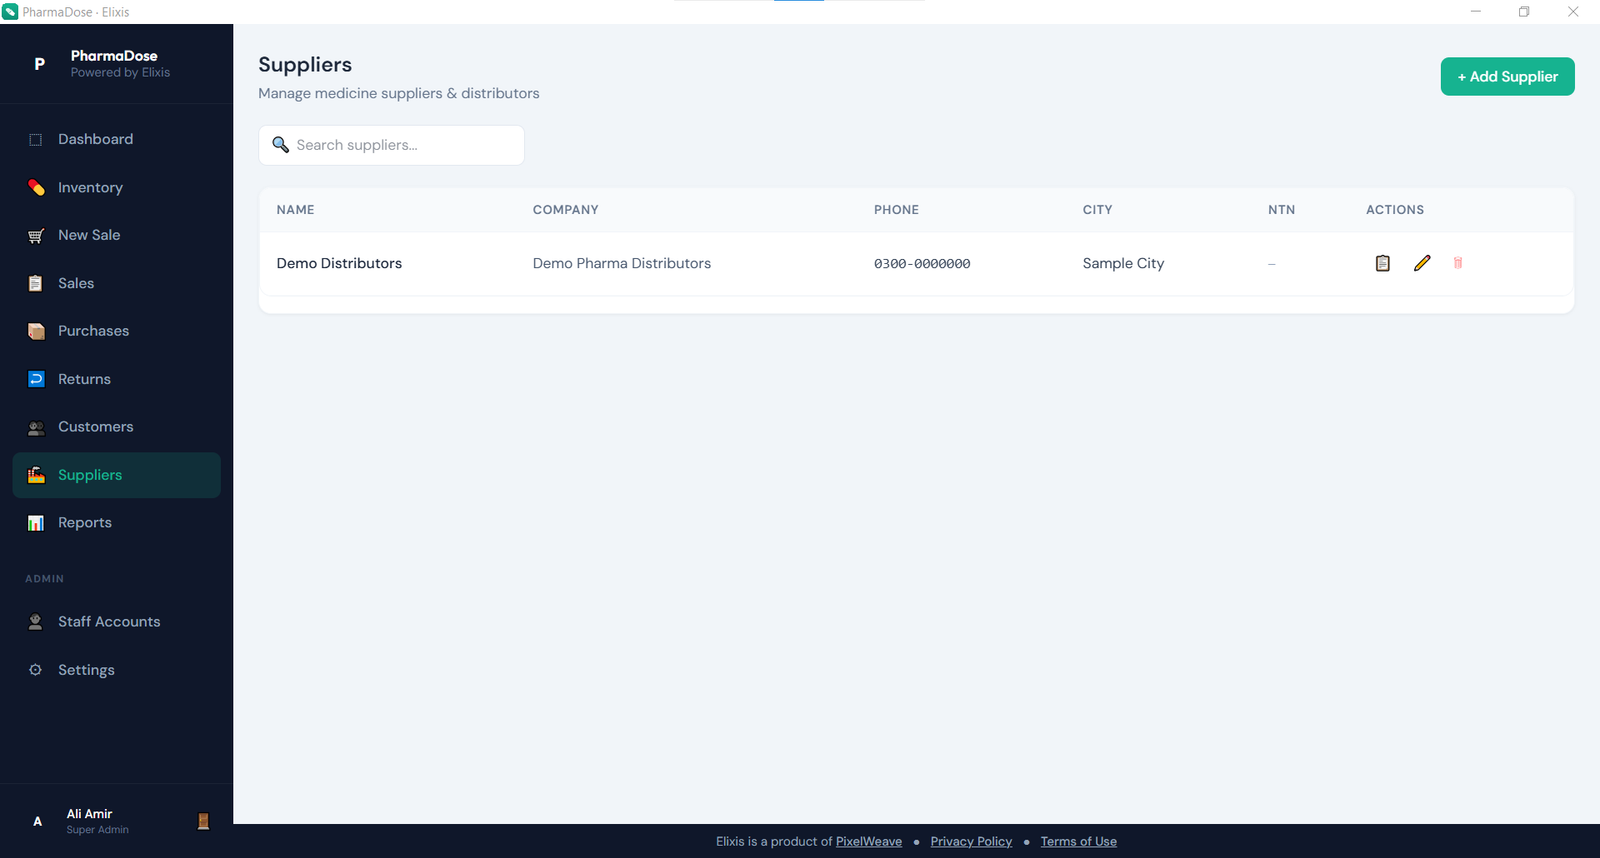
Click "+ Add Supplier" and input Contact Person, Company Name, Telephone, Email, City, National Tax Number (NTN), and physical warehouse address.
10.2 Procurement Ledger
Click the ledger icon (📋) next to any supplier to view your historical purchase volume, total amount invoiced, and breakdown of past consignments.
Chapter 11
11. Reports & Business Analytics
The Reports module converts your operational data into actionable financial and inventory intelligence across eight specialized tabs.
11.1 Date Range Controls
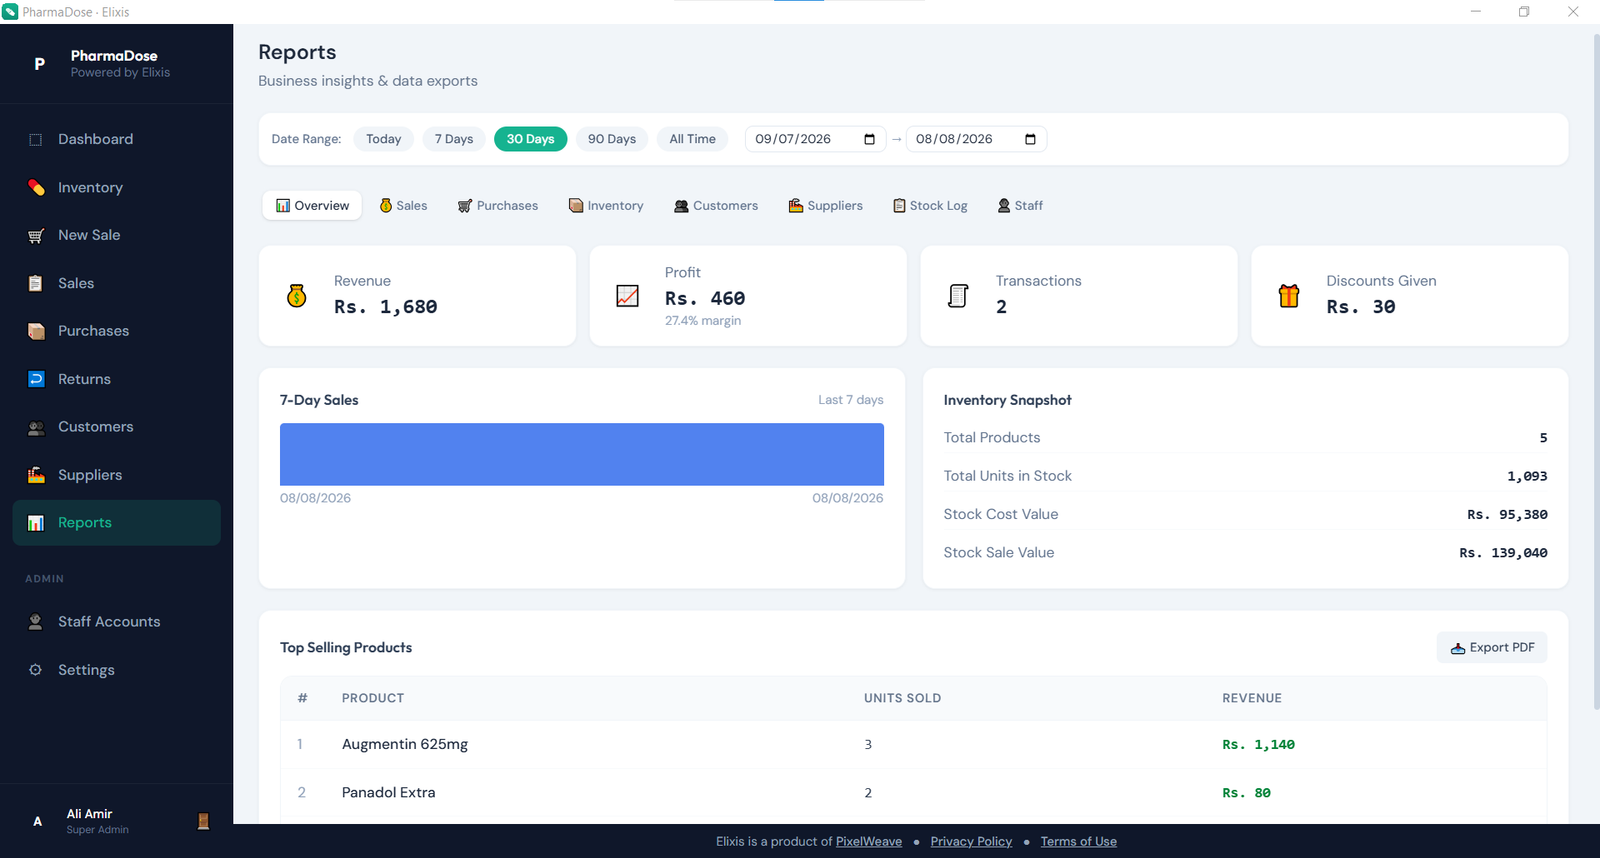
Filter any report using quick presets (Today, 7 Days, 30 Days, 90 Days, All Time) or specify exact custom calendar dates. All calculations recalculate instantaneously.
11.2 Analytical Tabs Overview
- Overview: High-level financial KPIs: Gross Revenue, Cost of Goods Sold (COGS), Net Profit, Gross Margin %, Total Sales Transactions, and Top 5 Best-Selling Medicines by volume and revenue.
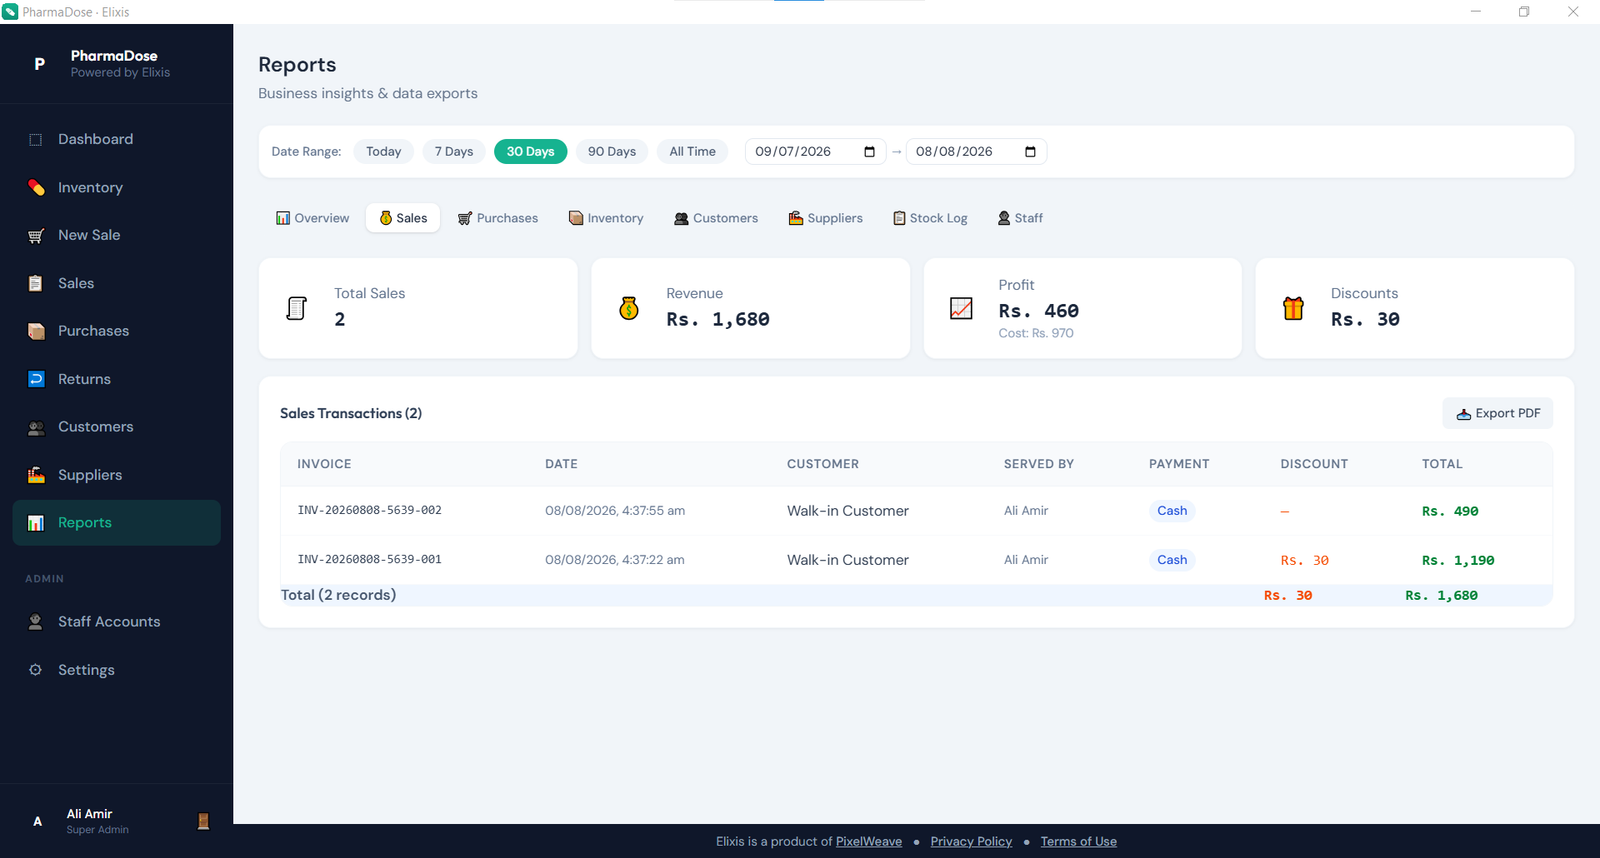
- Sales: Detailed sales journal with discounts, payment methods, staff attribution, and gross margin per transaction.
- Purchases: Complete register of distributor deliveries and total wholesale capital expended.
- Inventory Valuation: Live appraisal of current physical assets displaying total units on hand, total inventory value at cost price, and total inventory value at retail selling price, alongside expiring and dead stock tables.
- Customers: Ranked league table of your highest-value repeat patients.
- Suppliers: Ranked expenditure table of wholesale distributors.
- Stock Log: Indelible, chronological audit trail recording every inventory movement (sales, purchases, manual stock adjustments, customer returns, supplier returns) with timestamps and user attribution.
- Staff Performance: Comparative breakdown of transactions rung up and revenue collected per team member.
11.3 Exporting Reports to Print-Ready PDF
Click "📥 Export PDF" in the top-right corner of any analytical tab to generate a clean, print-ready PDF formatted with your pharmacy's header, date range, and statistical tables for accounting records or tax audits.
Chapter 12
12. Staff Accounts & Permissions
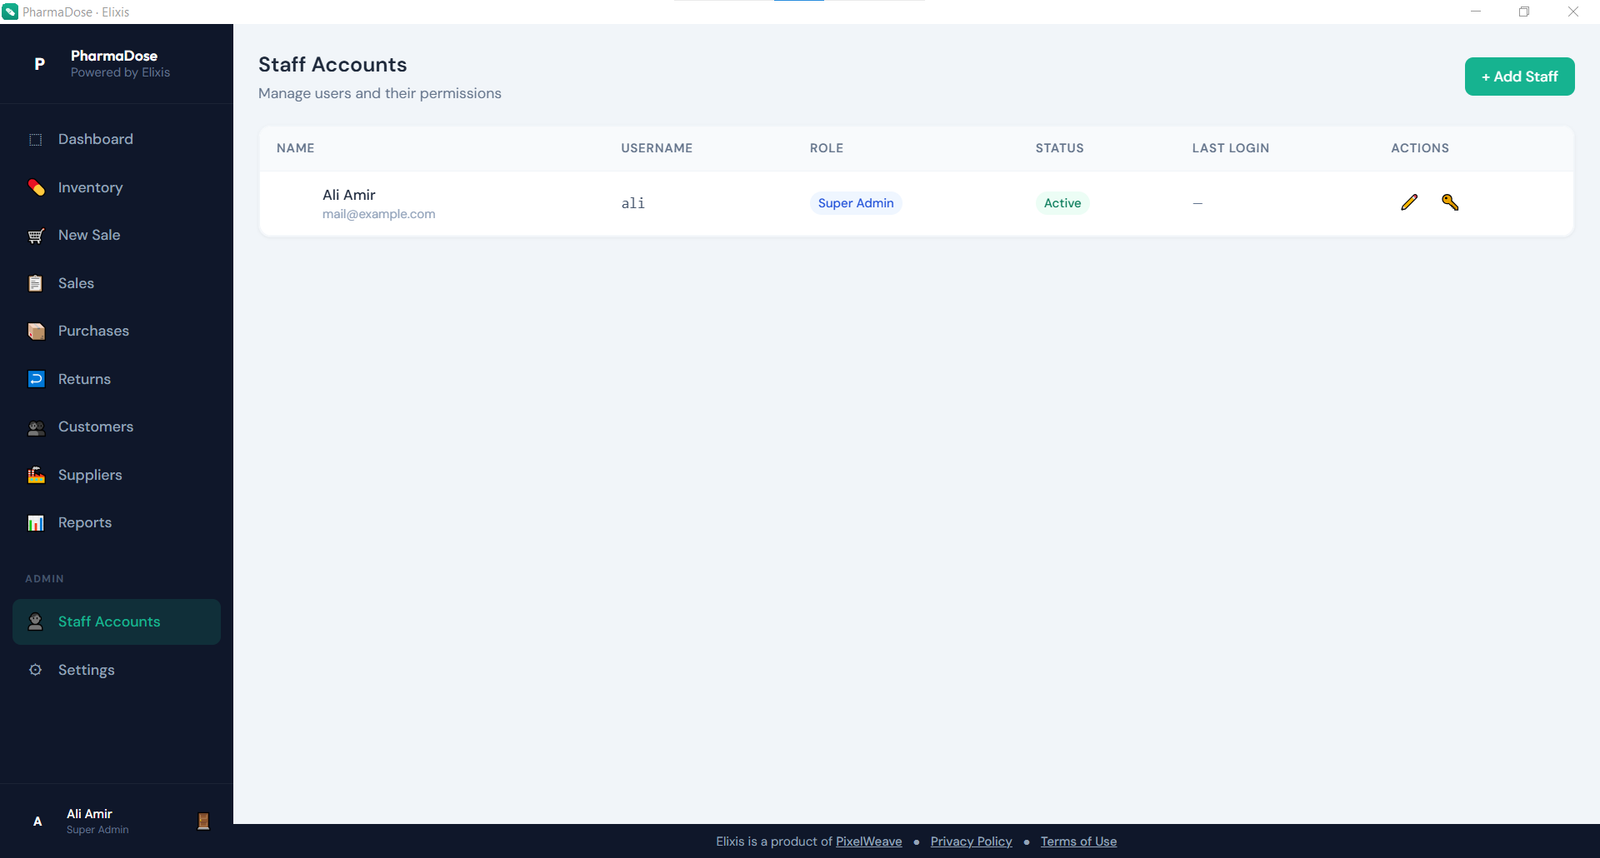
The Staff Accounts module (located under Admin → Staff Accounts) lets you configure dedicated credentials for each employee, ensuring comprehensive audit logs for all transactions.
12.1 Role-Based Access Control (RBAC) Matrix
Elixis provides two distinct security roles:
| Application Module | Super Admin Role | Staff Role (Cashier / Pharmacist) |
|---|---|---|
| Dashboard | ✓ Full Access | ✓ Cashier Metrics & Shortcuts |
| Point of Sale (New Sale) | ✓ Full Access | ✓ Full Access |
| Inventory Catalog | ✓ Full Access & Pricing Controls | ✓ Stock Lookup & Batch Inspection |
| Sales History & Customer Returns | ✓ Full Access | ✓ Full Access |
| Customer Directory | ✓ Full Access | ✓ Full Access |
| Purchases (Stock Intake) | ✓ Full Access | ✗ Restricted |
| Supplier Directory | ✓ Full Access | ✗ Restricted |
| Reports & Profit Analytics | ✓ Full Access | ✗ Restricted |
| Staff Accounts Management | ✓ Full Access | ✗ Restricted |
| Store Settings & Backups | ✓ Full Access | ✗ Restricted |
12.2 Managing Staff Credentials
- Add Account: Click "+ Add Staff Member", enter Full Name, Username (min 3 chars), Password (min 6 chars), and select their Role.
- Reset Password: Click the key icon (🔑) on any staff row to assign a new password immediately.
- Disable Account: Use the toggle button to temporarily disable an employee on leave without losing historical sales tied to their name.
Chapter 13
13. Store Settings & Configuration
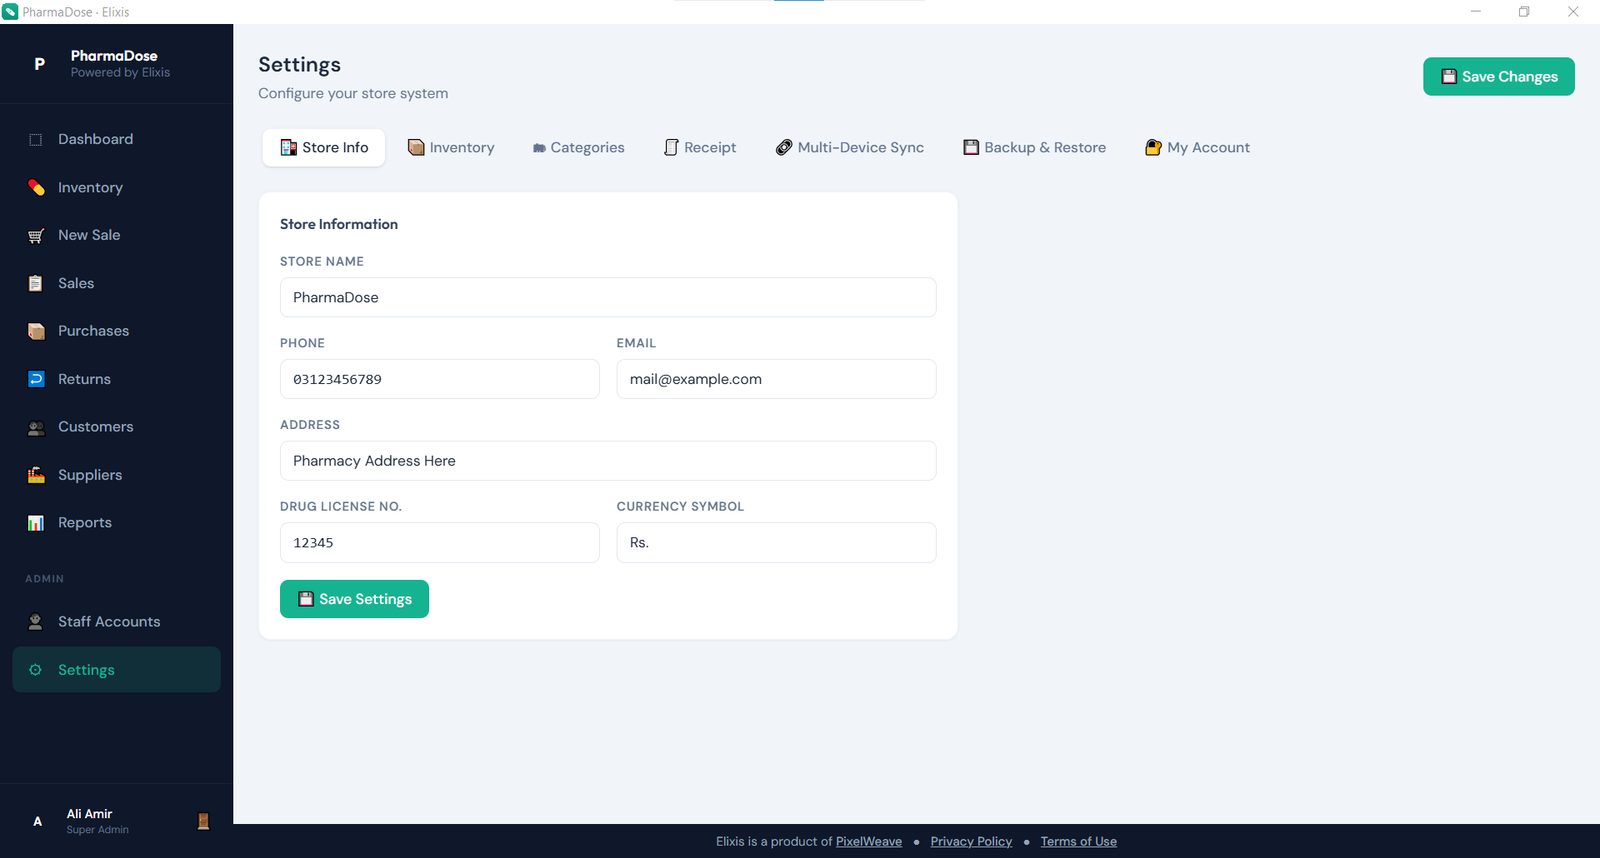
The Settings area (Admin → Settings) organizes pharmacy customization across eight intuitive tabs:
13.1 Store Information & Branding
Configure Store Name, Telephone, Email, Physical Address, Currency Symbol, and Regulatory Drug License Number. These values populate receipt headers and official export documents.
13.2 Inventory Defaults
Set the store-wide default low stock alert threshold (e.g., alert when 10 or fewer units remain) and standard dispensing unit of measure.
13.3 Categories Management
Create and manage therapeutic classifications. Note that a category cannot be deleted if active medicines are currently assigned to it.
13.4 Receipt Customization
Customize thermal receipt output: enter a custom footer notice (e.g., "Medicines once sold can only be returned within 3 days with receipt") and toggle drug license number printing.
13.5 Database Backup & Disaster Recovery
Protecting your pharmacy data against hardware malfunction is paramount:
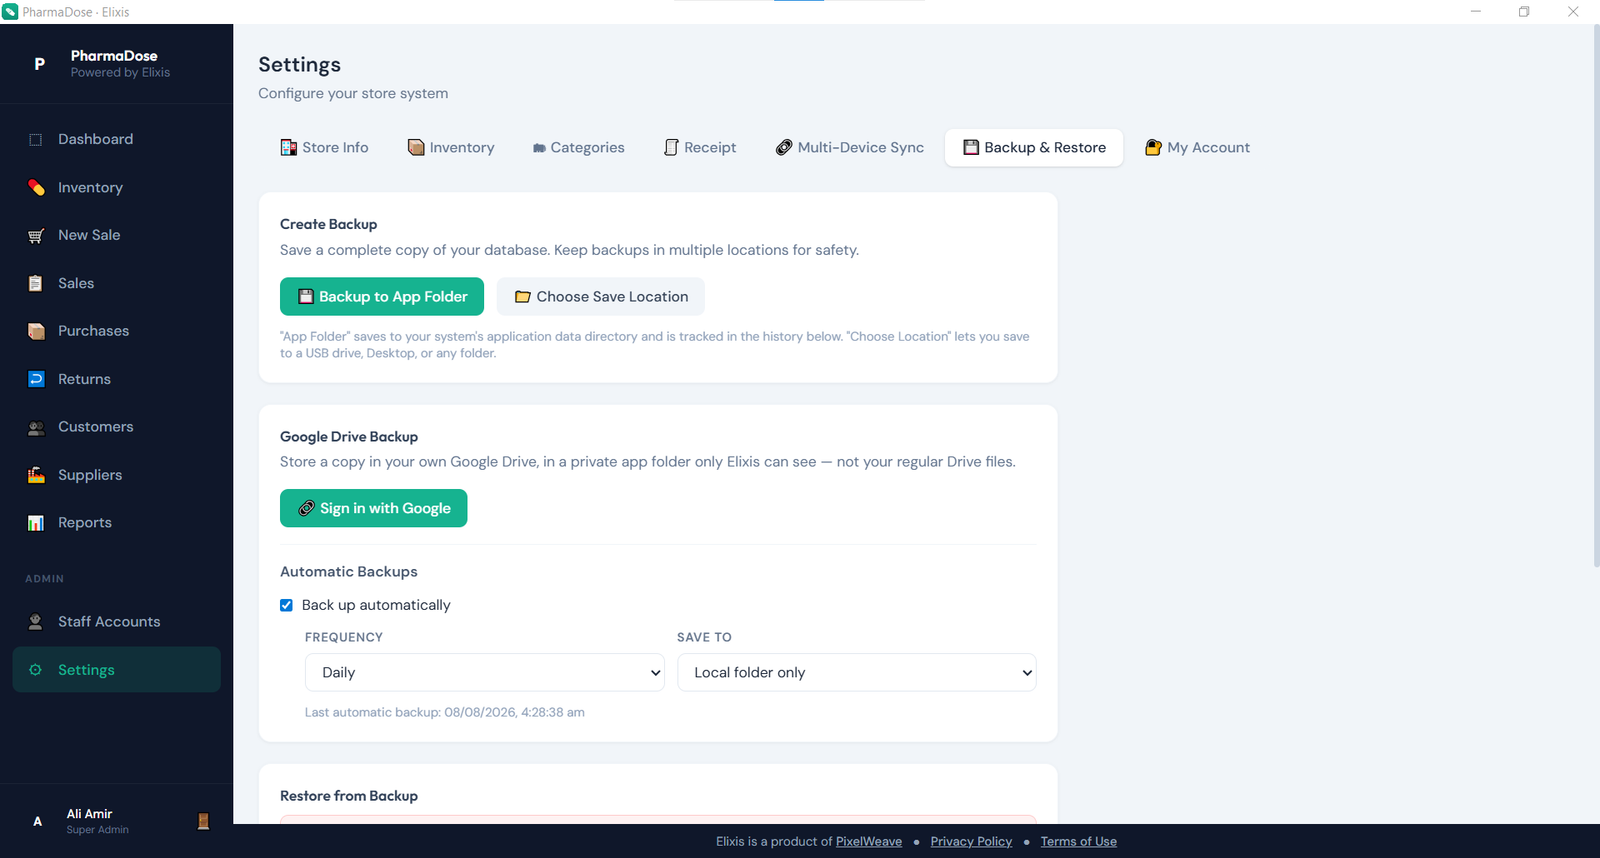
- Local Backups: Click "Backup Now" to create a point-in-time snapshot inside Elixis's secure backup repository, or click "Save As…" to export a copy onto a USB flash drive.
- Restoring Backups: Select any historical backup and click "Restore". Elixis verifies the backup integrity, updates the SQLite database, and restarts cleanly.
- Google Drive Automated Backup PRO: Connect your Google account under the Backup tab, choose a daily schedule, and specify how many rolling snapshots to preserve. Backups upload automatically in the background.
Chapter 14
14. Connecting Multiple Devices (Local Sync)
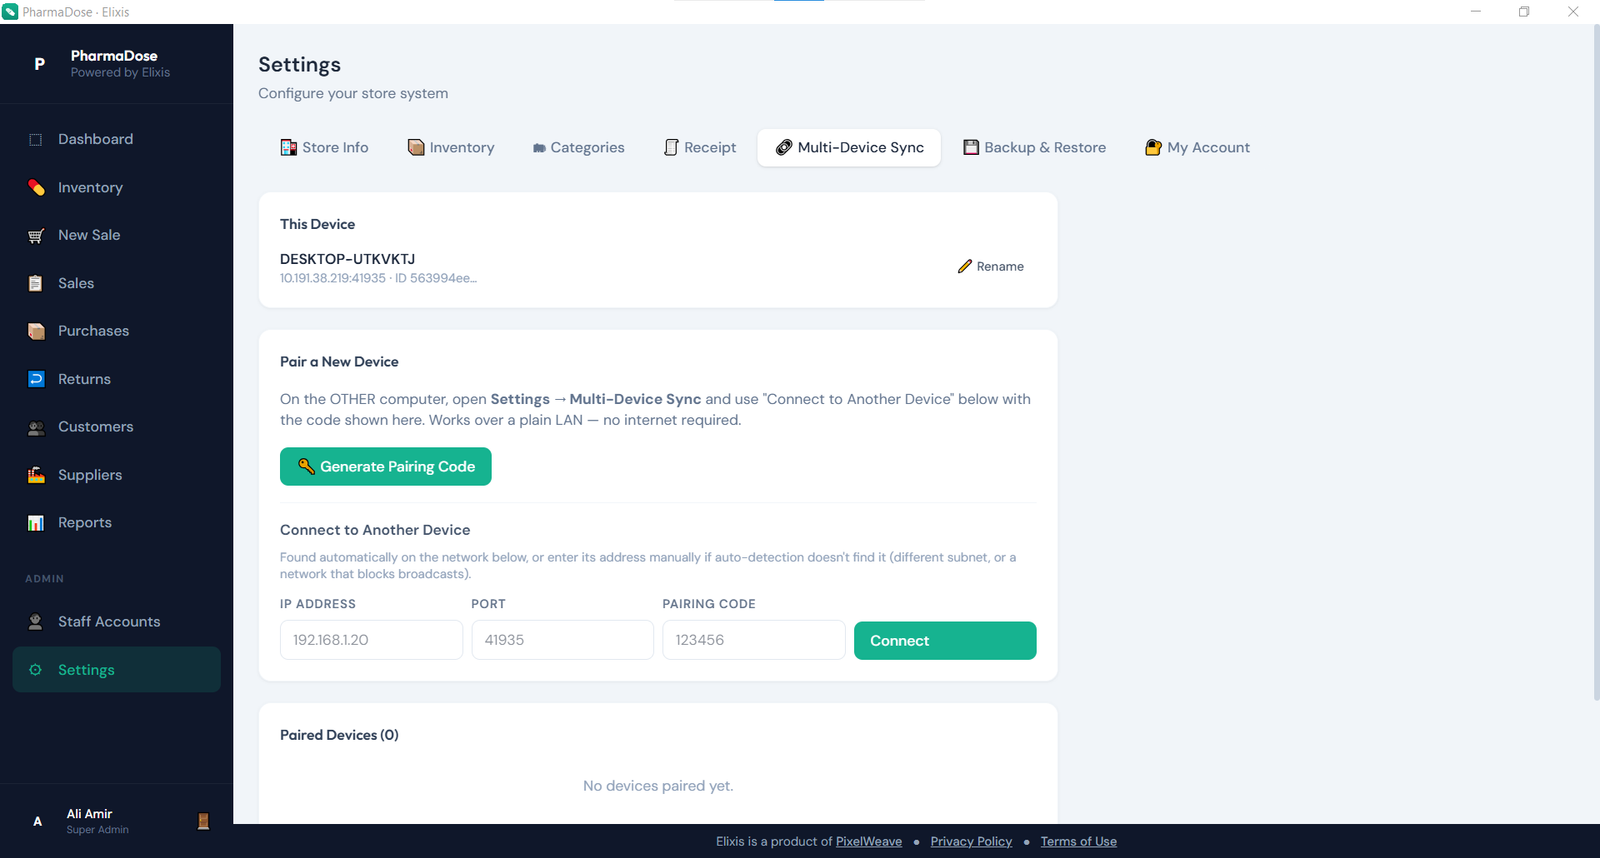
Elixis includes a high-speed, local-network peer-to-peer sync engine that allows multiple tills and dispensing counters to read and write to the same database simultaneously — with zero cloud hosting latency.
14.1 Step 1 — Generate Pairing Code on Main System
- On your primary store computer (the Main System), open Settings → Multi-Device Sync.
- Under "Add a Device", click "+ Generate Pairing Code".
- A 6-digit code will appear alongside an active countdown timer and this computer's local network IP address.
14.2 Step 2 — Pair the Companion Device
- On the companion counter till, open Elixis and click "🔗 Connect to an existing device" (or click "Connect to another device →" on the login screen).
- Select the Main System from the discovered devices list, enter the 6-digit pairing code, and click "Pair".
- Sign in with any existing employee credentials. All transactions, sales, and stock deductions now sync instantaneously across both machines.
Chapter 15
15. Free Version Limits & Upgrading to Premium
Elixis can be downloaded and used indefinitely for free. To support evaluation and micro-dispensaries, free installations operate under gentle volume ceilings that trigger upgrade notices when exceeded:
| Operational Feature | Free Edition Cap | Premium Licensed Edition |
|---|---|---|
| Active Medicines in Catalog | Up to 25 items | Unlimited |
| Sales Transactions | Up to 60 sales | Unlimited |
| Purchase Orders Received | Up to 25 deliveries | Unlimited |
| Customer Records | Up to 25 profiles | Unlimited |
| Supplier Profiles | Up to 10 distributors | Unlimited |
| Staff Accounts | 1 admin + 1 staff (2 total) | Unlimited |
| Multi-Device Local Sync | Not Available | Full Multi-Till Support |
| Automated Google Drive Backup | Manual Backups Only | Automated Cloud Backups |
15.2 Purchasing & Activating a License
- Open Settings → License on your main computer.
- Click "Copy" next to your unique Hardware ID (HWID).
- Send payment via JazzCash, Easypaisa, or Meezan Bank to PixelWeave.
- Share your Hardware ID and payment screenshot via WhatsApp at +92 309 4957856 or by email to info@pixelweave.tech.
- You will receive an official license key. Paste it into the license box and click "Activate". All free limits are lifted immediately across your main system and all paired companion devices.
Chapter 16
16. Keyboard Shortcuts, Menu & Updates
16.1 Global Counter Shortcuts
Speed up sales and navigation with keyboard hotkeys (use Cmd on macOS):
| Keyboard Shortcut | Operational Action |
|---|---|
| Ctrl + N | Open New Sale till immediately with focused search |
| Ctrl + D | Navigate to Dashboard |
| Ctrl + I | Navigate to Inventory Catalog |
| Ctrl + S | Navigate to Sales History |
| Ctrl + R | Navigate to Financial Reports |
| Ctrl + B | Quick Trigger: Create Instant Database Backup |
16.2 Checking for & Installing Updates
Elixis checks for software enhancements and security patches in the background. When an update is available, a notification banner appears giving you options to "Update Now", "Remind Me Later", or "Install on Next Restart" so your counter service is never interrupted unexpectedly. You can also trigger a manual check anytime via Help → Check for Updates….
Chapter 17
17. Troubleshooting & Frequently Asked Questions
17.1 "I can't add any more medicines, sales, or customers."
You have reached a free tier evaluation cap (see Chapter 15). Simply activate an Elixis license key to lift all limits immediately without disrupting existing data.
17.2 "I forgot my administrator password."
If another Super Admin exists on the system, they can open Admin → Staff Accounts and click the key icon (🔑) next to your name to set a new password. If you are the sole Super Admin, contact PixelWeave support directly at info@pixelweave.tech.
17.3 "A cashier cannot see Purchases, Reports, or Settings."
This is standard security behavior. Non-admin accounts assigned the Staff role are deliberately restricted to the sales counter, inventory lookup, and customer service modules. To grant access, promote the account to Super Admin in Staff Accounts.
17.4 "A companion device shows 'Connecting…' and fails to load data."
Ensure the Main System computer is powered on, that Elixis is running on it, and that both computers are connected to the same local Wi-Fi router or Ethernet switch.
17.5 "Can I recover a medicine removed by mistake?"
Deleting a medicine marks it inactive to protect transaction history. To resume stocking it, simply add it again as a new medicine or contact technical support to reactivate the hidden record.
17.6 "Does Elixis require an internet connection to operate?"
No. Elixis is 100% offline-first. All counter sales, inventory deductions, receipts, and multi-device sync run entirely over your local hardware. Internet is only required when checking for software updates or syncing backups to Google Drive.
17.7 "Where do I see today's cash drawer balance for closing the till?"
Check the Today's Revenue card on the Dashboard or view the summary strip at the top of the Sales History screen (Ctrl + S).
Reference
Appendix A: Pharmacy POS & Elixis Glossary
| Term | Operational Definition |
|---|---|
| Batch | A distinct shipment or consignment of a medicine received with its own manufacturer batch identifier, specific expiry date, and unit cost price. |
| FEFO | First-Expiry, First-Out — Elixis's automatic algorithm that guarantees stock expiring soonest is deducted first during counter sales. |
| Main System (Host) | The primary computer in your pharmacy that stores the active SQLite database file (elixis.db). |
| Companion Device | A secondary till or workstation connected to the Main System over the store's local network without storing local database files. |
| Pairing Code | A short-lived 6-digit security code generated by the Main System to authenticate and pair a new companion computer securely. |
| Hardware ID (HWID) | A cryptographic hardware fingerprint used to license Elixis to your specific pharmacy installation. |
| Walk-in Customer | The default patient profile assigned to fast counter sales when personal contact records are not registered. |
| Consultation Fee | An optional fixed clinical fee appended to medicine sales for pharmacy-based patient consultations or checkups. |